Sometimes, it’s really easy to determine how to create a hyperlink, but every platform is different. In this article, we’re going to show you how to create your own hyperlinks (aka make text clickable) and why it’s important.
There is a good chance that when reading a blog post, you have come across a hyperlink or two throughout the article. But what you may not have known is that successful bloggers place those links very carefully.
Every link in a blog post has a purpose, and that purpose can range from everything relating to credibility to money to SEO.
What is a Hyperlink?
A hyperlink is a word, phrase, or even a picture that is embedded with a link that when clicked, takes you to a new destination (or web page).
The telltale sign of a hyperlink on a website or other document is when the text is a different color (often, but no always, blue).

For example, when you click this highlighted text, it will bring you to the Create and Go homepage.
Or, if you click the links below, you will jump down to the sections within this article that teach what you came here for…how to create hyperlinks in several different scenarios:
We partner with some pretty awesome companies that offer products and discounts that help our audience achieve their goals. If you purchase through our partner links, we may get paid for the referral (at no additional cost to you). Read our disclosure for more info.
But – Have you ever wondered why hyperlinks are important?
Why Should I Use Links in My Blog?
There are several reasons you might want to create a hyperlink in your word-processing documents and emails. Using them in your blog goes beyond sending the reader to a new destination, however.
Below are just a few reasons you may want to add a hyperlink or two, or five to your blog posts.
Credibility
Multiple hyperlinks within a post may seem like overkill, but there is a reason behind all of those links.
Including hyperlinks throughout your blog posts adds credibility. A hyperlink gives credit to the resources you have used, proving that you are providing relevant and accurate information.
Boosted Conversions Rates and Potential for Revenue
Many of the hyperlinks on the blog posts on the Create and Go website will either send you to an affiliate partner, a course we sell, or even to a sponsor. This is just one way that we monetize our blog content.
Creating an internal link also can increase your conversion rate. By adding a hyperlink to buy a product, learn more, or subscribe, you are making it easier for readers to complete those desired actions.
The easier it is for the person to do something, the more likely they will do it.
Many successful bloggers also disguise their hyperlinks with a plugin like Pretty Links, which also helps you manage and track your links.
This is one of the best practices of affiliate marketing. It allows you to turn your affiliate links from affiliate partners into prettier links.
For example, our affiliate link for Kit (formerly ConvertKit), our favorite email marketing company is: https://partners.kit.com/id1eq4u27m0z
We use the Pretty Links plugin to create this “prettier” link: https://createandgo.com/recommends/convertkit
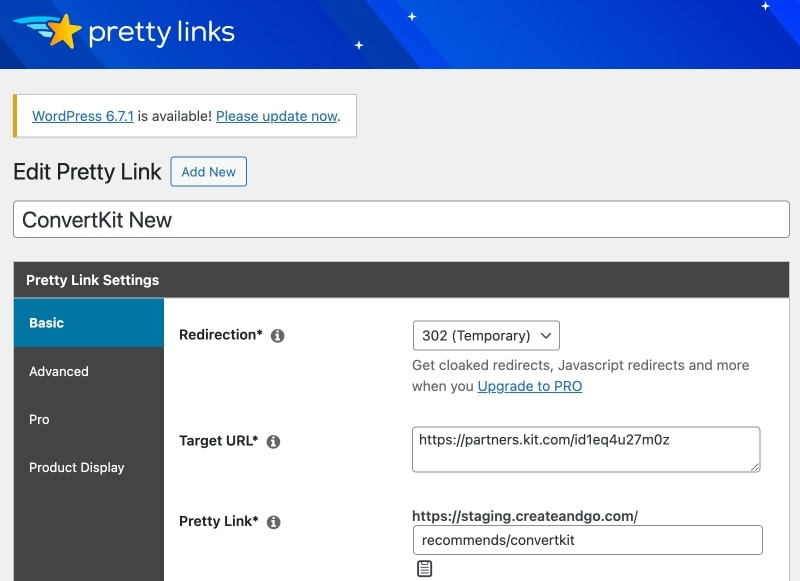
As an affiliate marketer, you are constantly sharing links. Pretty Links allows you to organize and keep all of them in one place, making your marketing efforts easier to track.
Increased Engagement
Adding an internal hyperlink here and there keeps readers on your site longer. It allows you to link to products or previous blog posts you have written that will hopefully keep them engaged longer.
The longer users stay on your site, the more likely your search engine results page (SERP) ranking will improve.
A SERP ranking is where a website appears when someone Googles a topic, and your hyperlink(s) might make the difference on whether your blog post is on the first page of Google results or not.
If your blog article gets more clicks, it becomes a more trusted link resulting in better SERPs rankings.
This is also a key part of SEO, which is what we’ll talk about next.
How Do Hyperlinks Help Your Blog’s SEO?
Possibly the most important reason to learn how to create a hyperlink in your blog post is to improve search engine optimization (SEO).
SEO refers to optimizing your website, the relevancy of the links on it, and how favorable those links are.
Almost everyone uses a search engine at least once daily if not more. Those top results that appear have the highest SEO, which is decided by Google by what site has had the most clicks and includes the most relevant information.
Using SEO best practices helps your site accomplish the goal of increased organic traffic. One of the many “best practices” is internal and external hyperlinking.
This is one of the most important reasons why you should learn how to create a hyperlink.
Having both outbound (external) and inbound (internal) links in your blog post improves your searchability and authority.
An external link is a hyperlink that leads to someone else’s website. An internal link is a hyperlink that links back to another post on your own website.
Sharing relevant and credible information leads to others including your blog article in their post, which provides outbound clicks.
Related: 6 Best SEO Tools for Your Blog
How to Make a Hyperlink
Hyperlinks are more than just copied and pasted URLs you grabbed from your search bar. These clickable links can direct you from a blog post, word document, or email to:
- PDF documents
- Word or text documents
- Audio files
- Videos and images
- Another section on the same webpage
- A different webpage or URL
What a lot of people want to know is how to make a link clickable, but the answer can depend on the application you are using.
For many people, inserting a hyperlink is second nature on most platforms. However, it’s not as intuitive to create a hyperlink on some platforms. With that in mind, let’s go over a few methods of creating a clickable link.
How to Make a Link Clickable in Microsoft Word
The process of how to create a clickable link in a Microsoft Word document is relatively simple.
- Step 1: Start by highlighting the text that will navigate the reader to the associated resource.
- Step 2: Using the toolbar at the top of the screen, select “insert.”
- Step 3: Locate the links icon and click the down arrow.
- Step 4: A dropdown will appear. Choose “link,” then choose a document or select insert link.
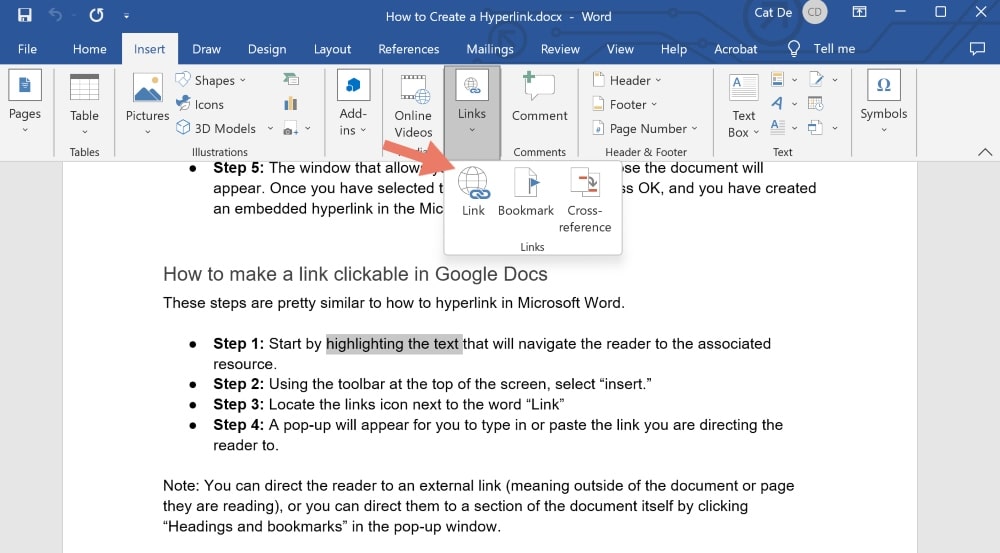
- Step 5: The window that allows you to insert the link or choose the document will appear. Once you have selected the proper destination, press OK, and you have created an embedded hyperlink in the Microsoft Word document!

Alternatively, you can also highlight the desired text and right-click on the highlighted text to bring up a list of options that includes the option to add a hyperlink:

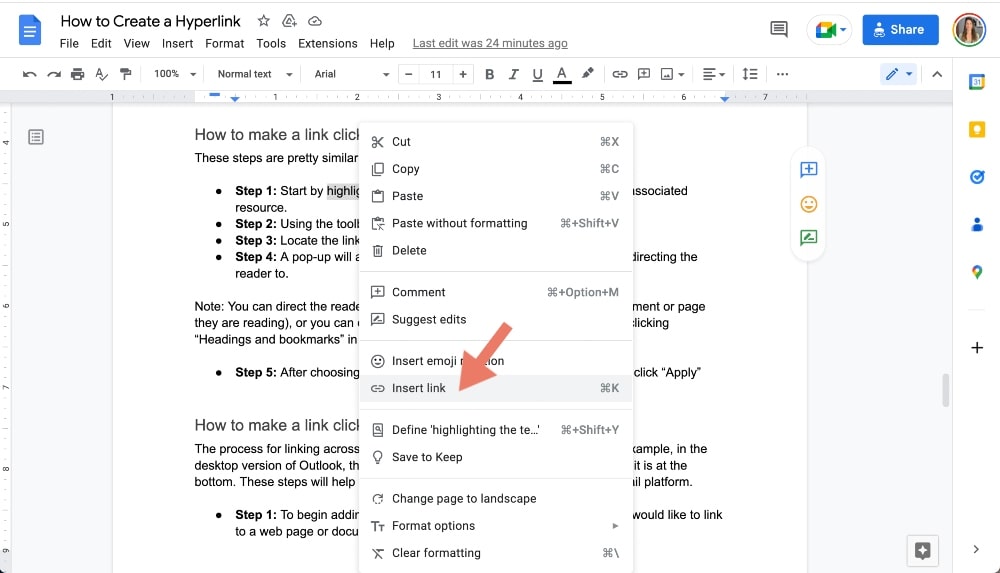
How to Make a Link Clickable in Google Docs
These steps are pretty similar to how to hyperlink in Microsoft Word.
- Step 1: Start by highlighting the text that will navigate the reader to the associated resource.
- Step 2: Using the toolbar at the top of the screen, select “insert.”
- Step 3: Locate the links icon next to the word “Link”

- Step 4: A pop-up will appear for you to type in or paste the link you are directing the reader to.
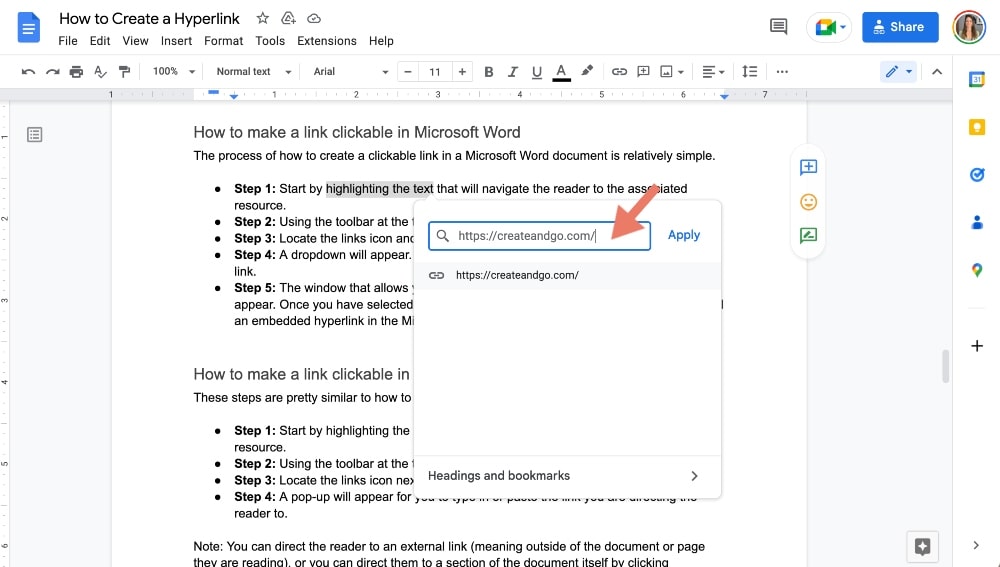
Note: You can direct the reader to an external link (meaning outside of the document or page they are reading), or you can direct them to a section of the document itself by clicking “Headings and bookmarks” in the pop-up window.
- Step 5: After choosing the destination you want to direct your reader to, click “Apply”
Alternatively, you can also highlight the desired text and right-click on the highlighted text to bring up a list of options that includes the option to add a hyperlink:
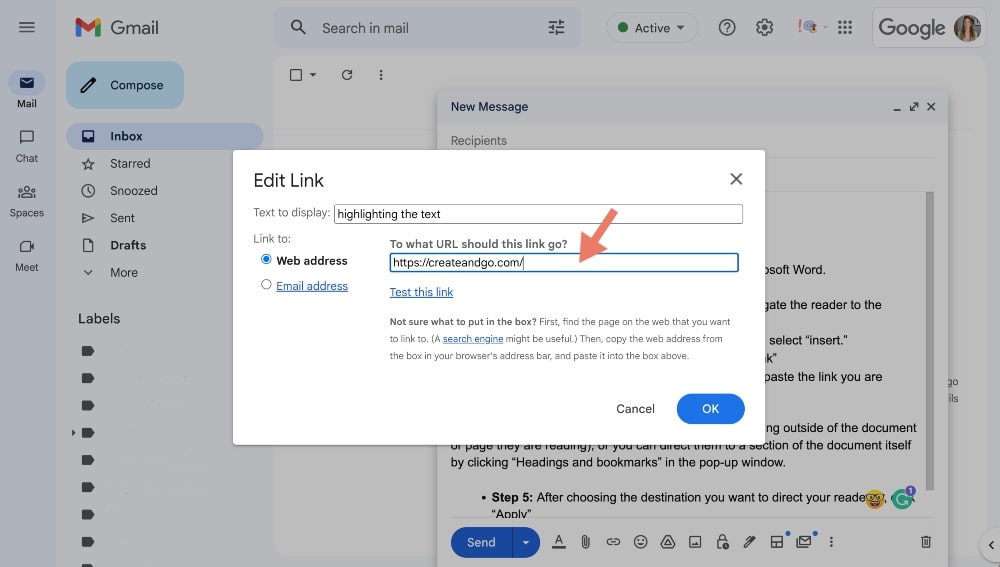
How to Make a Link Clickable in an Email
The process for linking across various email platforms is almost identical. For example, in the desktop version of Outlook, the toolbar will be located at the top, and for Gmail, it is at the bottom. These steps will help you create a clickable link within your chosen email platform.
- Step 1: To begin adding a hyperlink to your email, highlight the text you would like to link to a web page or document.
- Step 2: After you have chosen the clickable text, click on the “add link” icon located on the toolbar.
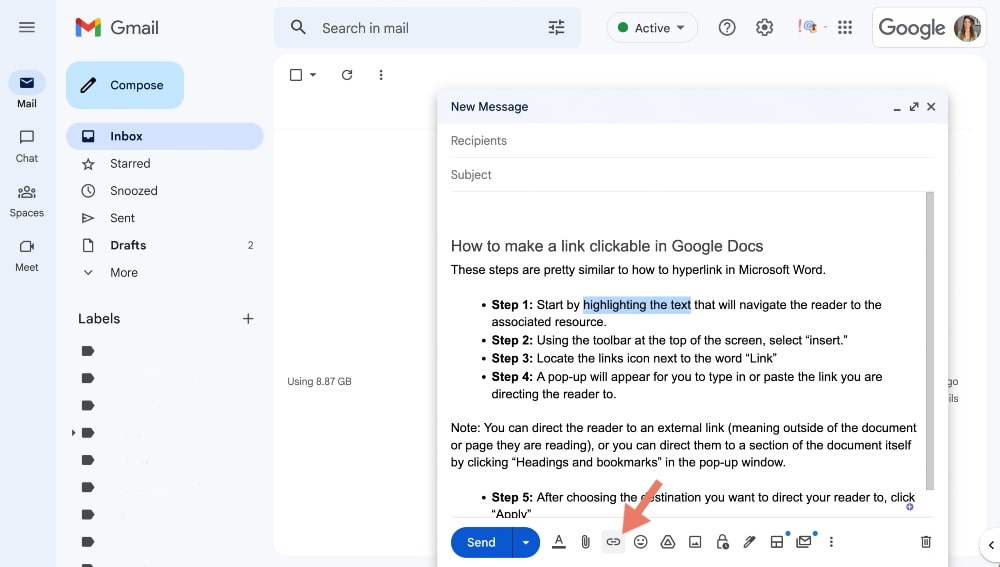
- Step 3: Insert the URL or document location you would like to navigate in the respective box and press OK. You have now created a clickable hyperlink within the body of the email!
How to Make a Link Clickable in a Blog Article
Many blog writers use visual editors, such as WordPress, Wix, and Squarespace, to publish their articles. Creating a hyperlink on any of these sites involves a similar process.
- Step 1: First, highlight the text you would like to be clickable.
- Step 2: Once highlighted, a text editing bar will either pop up or be at the top of the screen. When this appears, click the “link” icon.
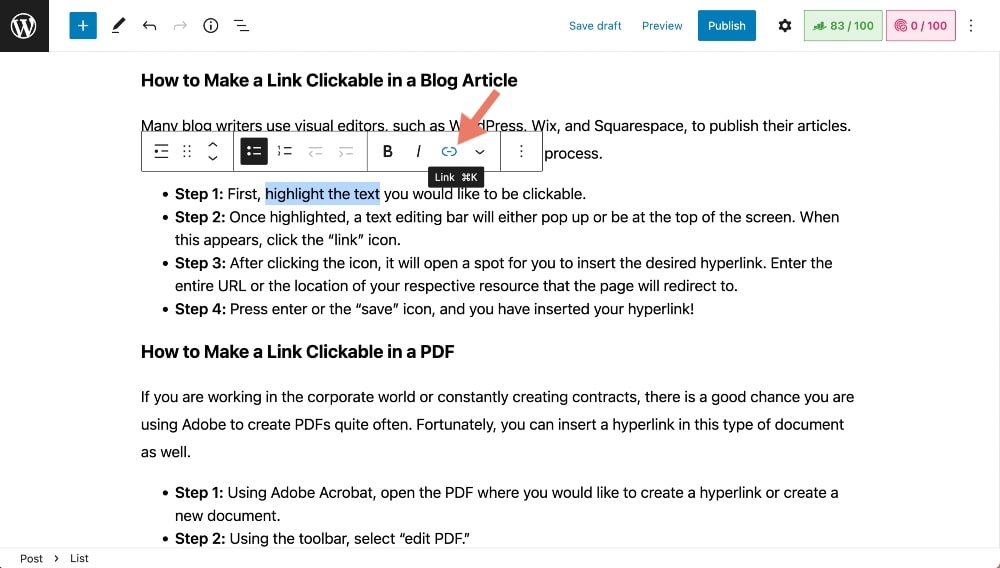
- Step 3: After clicking the icon, it will open a spot for you to insert the desired hyperlink. Enter the entire URL or the location of your respective resource that the page will redirect to.
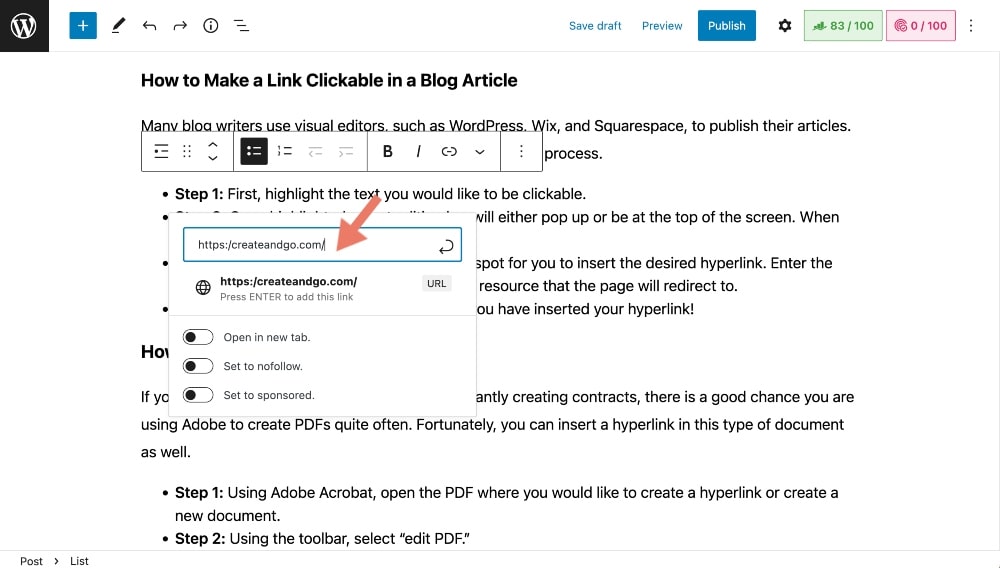
- Step 4: Press enter or the “save” icon, and you have inserted your hyperlink!
How to Make a Link Clickable in a PDF
If you are working in the corporate world or constantly creating contracts, there is a good chance you are using Adobe to create PDFs quite often. Fortunately, you can insert a hyperlink in this type of document as well.
- Step 1: Using Adobe Acrobat, open the PDF where you would like to create a hyperlink or create a new document.
- Step 2: Using the toolbar, select “edit PDF.”
- Step 3: You will then choose “link” and select either “add” or “edit.”
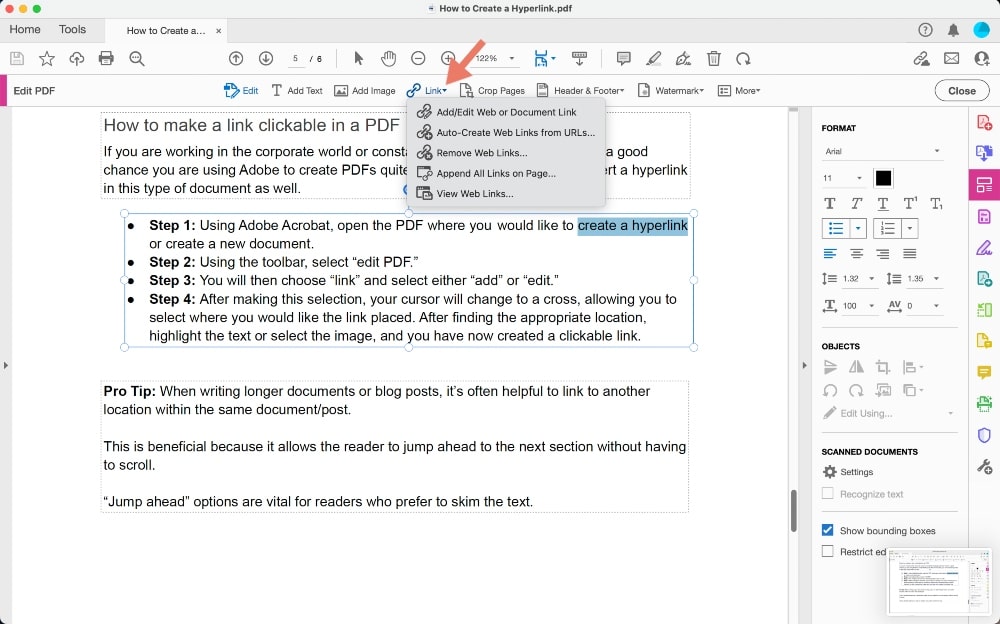
- Step 4: After making this selection, your cursor will change to a cross, allowing you to select where you would like the link placed. After finding the appropriate location, highlight the text or select the image, and you have now created a clickable link.
- Step 5: You might need to select what type of link you want to add. Select “web page” if you want to link to a website.
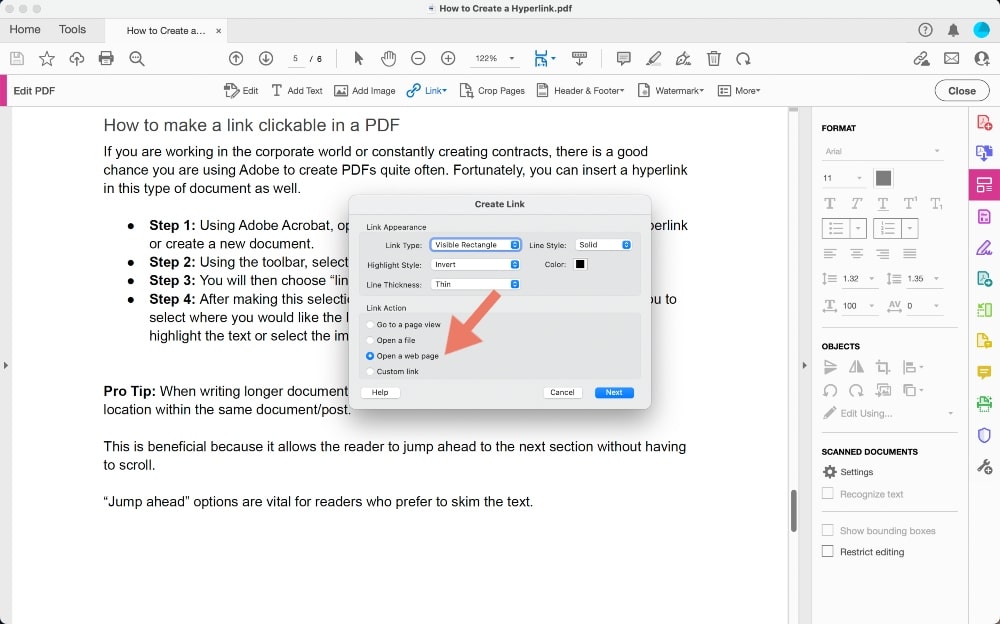
- Step 6: Click next and type in the destination URL.

Pro Tip: When writing longer documents or blog posts, it’s often helpful to link to another location within the same document/post.
This is beneficial because it allows the reader to jump ahead to the next section without having to scroll.
“Jump ahead” options are vital for readers who prefer to skim the text.
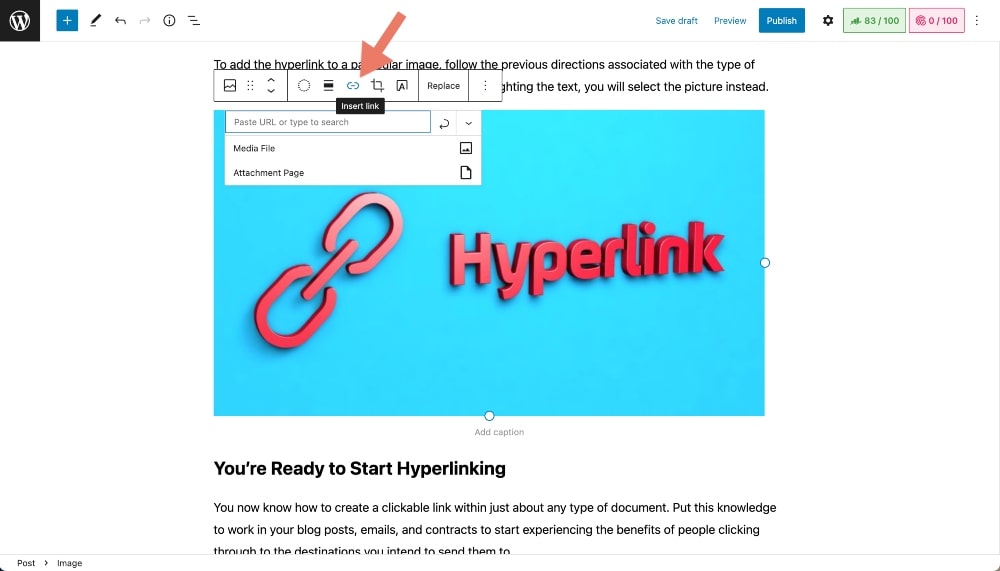
How to Hyperlink an Image
Sometimes you may want an image to be clickable so it can take you to a relevant webpage or document or even enlarge the photo.
This can be achieved in all the previous document types we discussed.
To add the hyperlink to a particular image, follow the previous directions associated with the type of document you are editing. However, instead of highlighting the text, you will select the picture instead.
You’re Ready to Start Hyperlinking
You now know how to create a clickable link within just about any type of document. Put this knowledge to work in your blog posts, emails, and contracts to start experiencing the benefits of people clicking through to the destinations you intend to send them to.
If you have any more questions about how to create a hyperlink, feel free to ask us in the comments below!
Comments