If you’re curious about how to use WordPress but feeling a bit overwhelmed trying to decipher tech-filled posts, we’ve got your back.
In this easy-to-read guide, we’ll cover everything from exactly how to make a WordPress website and how to work WordPress in your favor to settings and themes and everything in between.
We’ll also share some feedback from real bloggers using WordPress to make their blogging dreams a reality.
What is WordPress and What is it Used For?
WordPress is a content management system (CMS) that allows you to create a website or blog from scratch, or improve an existing website.
WordPress is used by millions of people around the world, including many large organizations such as The Guardian, Forbes, The New York Times, Spotify, NBC, CBS, Disney, and more.
The platform has been operating since 2003, and according to Envisage Digital, 455 million websites worldwide use WordPress, and it holds 37 percent of the market share of the more than 1.3 billion websites that exist online.
It’s safe to say that WordPress is widely used, respected, and trusted.
Some of the most noteworthy benefits of using WordPress include, but aren’t limited to:
It’s free to download and install.
WordPress is completely free to the user. The only costs you will need to cover are web hosting and your domain name. We’ll break this down a little further in a moment.
It’s simple to use.
Quite a few website creation platforms are complicated, confusing, and difficult to navigate. And many of them are quite limited in terms of functionality.
WordPress, however, is known for its simplicity. Don’t confuse simplicity with basic though, as WordPress has impressive themes and customizable features to make your website stand out.
It’s flexible.
WordPress allows you to create a variety of different types of websites, depending on your choice.
It can host blog sites, forum sites, eCommerce shops, business pages, membership sites, event pages, learning management systems, digital portfolios and so much more.
Whatever type of website you need to create, WordPress has the availability to make that happen.
You don’t need to know how to code.
This is a big one! Many website creation programs require the user to be well-versed in coding to create their site.
In the case of WordPress, however, you don’t need to understand how to code – although it can help if you want to customize your website outside of the available themes, widgets, and plugins that exist.
The ability to plug and play with WordPress increases the accessibility of their platform and allows users of all types of technology levels to create their websites with ease.
If you’re worried that you need to be highly skilled and knowledgeable in computer technology to create your website, rest assured that with WordPress, you don’t.
It’s open-source software.
This means that one singular person or company does not own WordPress. This is beneficial to users as it allows for more contributions to make the platform better and easier to use.
These are just some of the many reasons WordPress is a reliable and popular website creation platform. Now, let’s explore the common point of confusion about WordPress a lot of website owners get wrong – should you use WordPress.com or WordPress.org?
WordPress.com vs. WordPress.org
Yes, there are two different types of WordPress! And, it’s critical you use the correct one for your blog’s needs.
A Brief Look at WordPress.com
WordPress.com provides the web hosting for you, meaning you won’t need to purchase that separately. BUT — you don’t own your domain name.
When using WordPress.com, your domain name will automatically include “WordPress” in your website. It’s technically a subdomain of WordPress. For example www.myawesomesite.wordpress.com.
And, when using Wordpress.com, you won’t have “full creative control.” This means that:
- You can’t remove the ads and branding for WordPress from your website.
- Your storage space is limited (to 3GB at the time of this writing).
- You won’t be able to customize much when it comes to themes or plugins.
You can pay for WordPress.com to get these customizations and your own domain, but for the fees you’re charged, you might as well use WordPress.org instead.
Why WordPress.org is Better (Especially for Bloggers)
With a WordPress.org website, you must purchase your domain name and your web hosting.
The benefits of using Wordpress.org however, include the following:
- You can download free and paid plugins or custom-design your own.
- You can use any theme you want or even create your own theme and customize your website however you see fit.
- Depending on the hosting option you choose, you can have a lot more storage space.
- You can display your own ads and keep all the money your ads generate (less the cut any ad networks you use take).
WordPress.org is the better choice for bloggers that are serious about making money from their website and turning their blogs into a full-fledged business that they have full creative control over!
For a more in-depth look at why you should choose WordPress.org over WordPress.com, read our full guide to the differences between WordPress.org VS WordPress.com.
How To Make a WordPress Website
Now that you understand what WordPress is, and what it’s used for, we hope you’re feeling excited to start creating your own website!
The good news is… how to use WordPress is a very simple process.
Step 1. Select a WordPress Plan
This step is only for WordPress.com users. If you’re using WordPress.org, skip ahead to step 2. When getting started on WordPress, you need to choose a plan!
They offer three different plans and you can choose whichever one matches your needs the best. The plans they offer include:
- Free – this is the one where you don’t have a domain of your own. Instead, you have a subdomain of WordPress. This plan also has the least amount of customization!
- WordPress Starter – $60/year, billed annually – offers 6GB of storage, but no plugins or themes are permitted. And, you can’t sell products with WooCommerce with this plan.
- WordPress Pro – $180/year, billed annually – offers 50GB of storage and includes some plugins and themes as well as the ability to sell products with WooCommerce. However, you will still be limited in terms of customization options.
We REALLY hope we’ve convinced you to get a WordPress.org plan at this point. Moving on!
Step 2. Choose a Domain Name
A domain name is your permanent address on the internet. This is what people will type in on their internet browser to view your website.
Your domain name should generally be a representation of you or be descriptive of what your business is about (or some combination of those two).
You might need to give this some thought because there are millions of domain names in existence and they can’t be duplicated.
Sometimes you’ll find that your domain name is taken but a similar .co or .org or .blog version is available. Be careful using these because your name should ideally be unique and not trademarked or copyrighted already.
The last thing you want is to end up in legal hot water because you are “diluting a brand” or confusing customers into thinking you’re a competing website.
Also – as we mentioned in our How to Start an Online Business post, use caution about using any kind of domain with the word entrepreneur or a word that even sounds similar to it! Bloggers and businesses that use that word and similar words are constantly being sued by Entrepreneur Magazine, and they have won almost every case!
Trademark and copyright laws are no joke!
Additional Tips for Choosing a Domain Name
Here are our best tips for choosing a good domain name:
- Easy to spell, pronounce, and remember: For your audience’s sake!
- Keep it short: A shorter domain name is easier to type and less likely to be misspelled.
- Use keywords: Including keywords in your domain name can help improve your search engine optimization (SEO).
- Avoid hyphens: Hyphens can make it difficult for people to find your website.
Following these tips will help you choose a domain name that is both effective and memorable.
Your domain name is pretty important, but it also won’t make or break you and a blog with a less-than-ideal name can still be super successful. Don’t spend too much time here.
You can also use our blog name generator to get some ideas!

Step 3. Purchase Web Hosting
Think of web hosting as renting a space on the internet for your site to exist. It’s what makes your website visible online to others. If you’re using WordPress.com, they will provide the host for you, so you don’t need to worry about this section.
But if you’re using our recommendation of WordPress.org, you’ll need to get your own web hosting in this step. The good news is – there are a few great and affordable options to get started.
There are many options available for web hosting, some of the most common being:
Keep in mind that most plans are paid on an annual basis. The plans that offer a monthly payment are usually 4-5x more expensive.
Here at Create and Go, we recommend Bluehost. This is what we first started with and what we still run several websites on. They have great customer service and very affordable plans to get started.
We also partner with Bluehost to get a discount for our readers. You can sign up for as low as $1.99/month (paid annually) and it comes with a free domain name!
They also have a one-click install with WordPress, so the setup is super easy!
Step 4. Install WordPress
If you’re using WordPress.com, you will not need to do this as they are hosting your website for you. If you’re using WordPress.org, you might need to install WordPress onto your computer device.
This depends on what host provider you’re using. Some will automatically download WordPress for you, and others may allow you to simply use WordPress online.
If you choose a provider that does not download it for you, you will download it yourself within the host provider site. Once it’s downloaded, you’ll need to answer a few questions regarding your site and domain, and once those are confirmed, your site will be ready to go!
As we mentioned, Bluehost has a one-click install of WordPress to your site.
Step 5. Choose a Theme
Now that you have an active domain and web host (if needed), it’s time to get to the fun stuff — making your website look great!
This is the most exciting part for most people and that makes sense — it’s a showcase of your work and your business. In other words, it’s pretty important.
BUT that doesn’t mean that your website has to look perfect or be overly complicated, which is a pretty slippery slope when it comes to web design.
Also, keep in mind that the vast majority of people are visiting your website on a mobile device most of the time. So it’s really important that your website is optimized for mobile devices.
These days, there are thousands of WordPress themes — free, paid, mobile-friendly, and everything in between. You can choose from layouts, formatting styles, colors, fonts, and more.
The options are a little overwhelming, so let’s go over a few tips for choosing the right theme.
How to Choose the Right WordPress Theme
All WordPress themes have different levels of customization, user-friendliness, and costs. Keep these factors in mind when choosing a theme.
1. Get ideas and inspiration from other websites.
A great place to start is looking at other bloggers in your niche. If you’re not already reading other people’s blogs, you’re missing out on some key research that could help you set yourself up for success.
To find out what theme other bloggers are using, you can use a WordPress Theme Detector like the one created by WPBeginner.
BUT keep in mind that some WordPress websites are built with custom coding or themes, which means that you can’t get the theme that they are using.
It’s still good to look around though, because it will give you ideas and inspiration for certain features you might want to include in your website design.
2. What is your budget?
If your budget for a theme is free, your options are going to be very limited when it comes to customization and user-friendliness.
There’s no such thing is a free lunch, right? This is really how all free software works these days, so I just want to set the right expectation here.
There are still tons of free themes out there. Flash by Themegrill is one of our favorites – or Astra with the Elementor plugin.
Just keep in mind that you won’t be able to make your website look exactly how you want it. You might be limited on features like changing your menu color, adding a banner to your page, etc.
This is a great option if you can find a free theme that works for you, but if it’s in your budget, you might want to opt for a theme with a bit more power and customization.
3. How important is customization to you?
If you’re someone who wants to get your website to look exactly as you envision it in your head or you just want to have a lot of options when it comes to customizations, you should probably look for a good paid theme.
Divi is generally considered to be one of the most customizable and also user-friendly themes on the market.
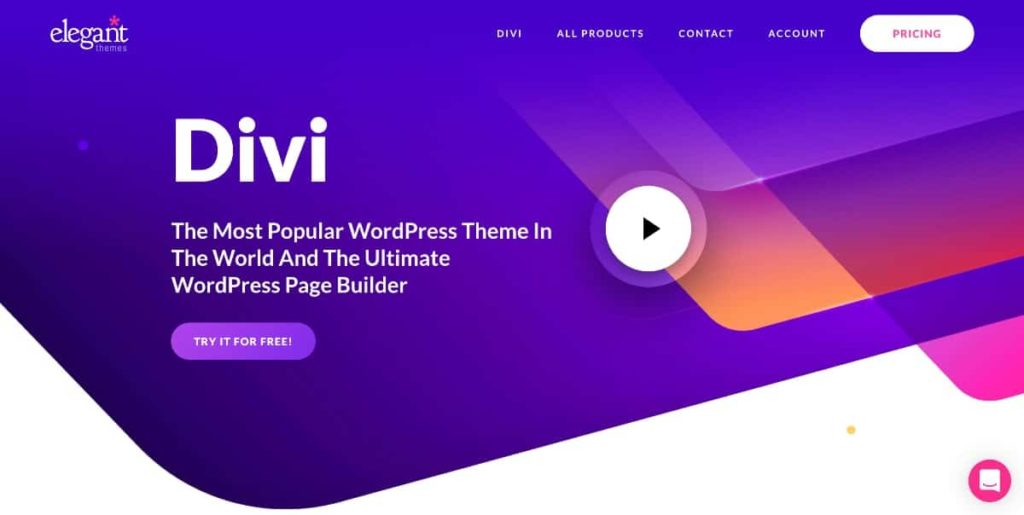
The cool thing about Divi is that when you purchase it, you get access to the entire Elegant Themes collection with over 70+ other themes to choose from.
The downside is that all of this customization and user-friendliness comes at a cost. It’s a bit on the pricier side, but they do have a guarantee with it. You can try it out and return it, risk-free.
Another powerhouse option is Genesis Framework — it’s one of the fastest themes on the market, but it can be pretty difficult to customize on your own if you don’t have any CSS coding skills.
Regardless of which theme you choose, make sure that there is a good return policy in case you don’t like it. Sometimes, it takes trying out 3-4 themes before you really find one that works well for you personally.
You can also check out our article on the best WordPress themes here.
Step 6. Add Content to Your Website
When adding content to your WordPress website, you will be working in the Posts and Pages section of WordPress.
Posts will always automatically put the newest “post” to the top of your website and are typically used for blog websites (articles) and portfolios.
To add a post to your website, go to your “admin dashboard”, choose the “posts” section, then “add new”.
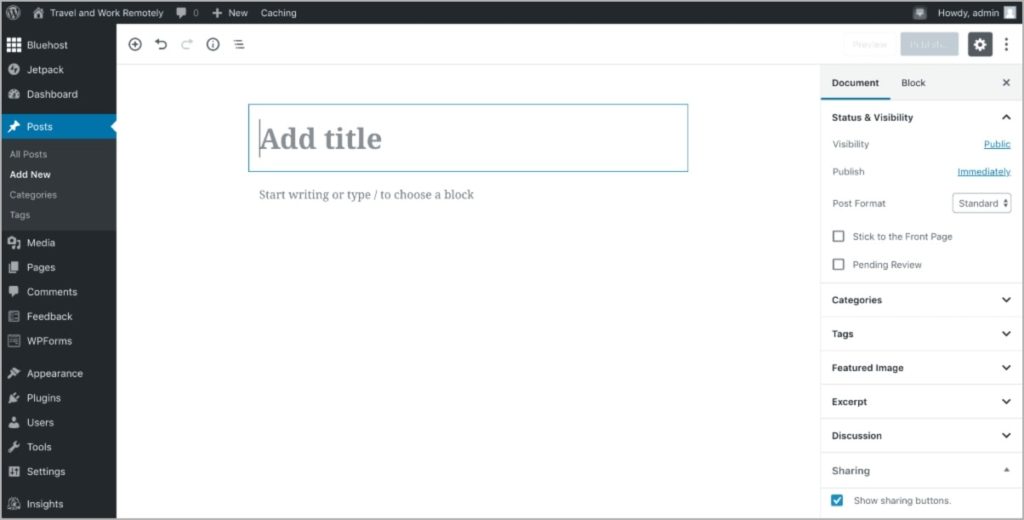
You have the option to add a title for your post, change the format, insert elements (i.e. text, graphics, and embedded videos), etc…
If you want the post immediately shared on your website, choose the “publish” option.
Not ready to publish? That’s okay. You can also schedule it to go live at another date, or simply save it as a draft.
Unlike posts, pages will remain in the order you initially put them in and these are typically used on business websites and eCommerce blogs to create landing pages, product pages, and shops.
Pages are also commonly used for the legal pages on your website.
To add a page to your website, you’ll follow the same steps listed above – only instead of clicking “Posts,” you’ll select “Pages.”
We’ll share more on this later.
Step 7. Install Plugins
A plugin is a piece of software that adds functionality and features to your website. WordPress has thousands of plugin options available (both free and paid).
To search and add plugins, choose the “Plugin” option in your “admin dashboard.”
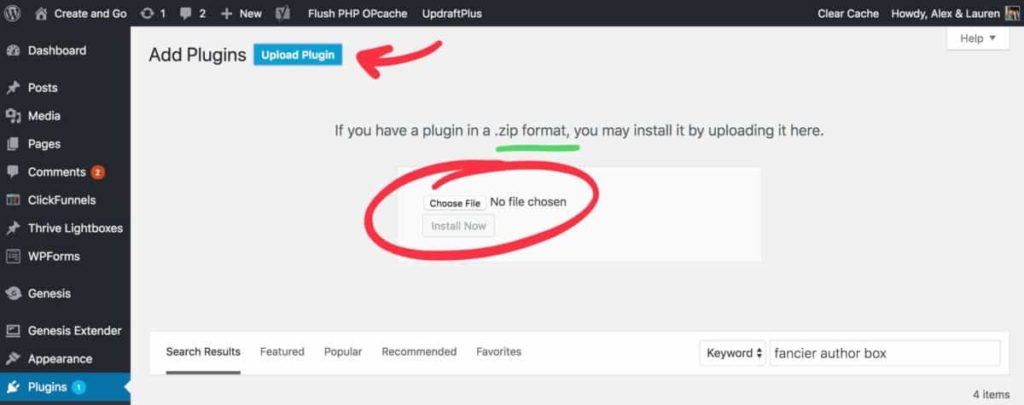
When you’re ready to add or purchase a plugin for your site, choose the “add now” option within the plugins section, install the plugin, and activate it.
You can also download a plugin from an external website and then upload it directly to your site:
Related: Read our post 16 Best WordPress Plugins for Blogs.
Choose Your Plugins Wisely
Perhaps one of the most important keys to how to use WordPress that not enough bloggers talk about is the fact that you must choose your plugins wisely.
While you need to add plugins for a variety of reasons, too many will slow your website down. And nothing makes a visitor bounce faster than a slow-to-load website.
I mean, what do you do when a website takes longer than 2.3 seconds to load?
YOU BOUNCE!
High bounce rates will also negatively impact your SEO ranking too. 😣
Google looks at every website’s bounce rate (the time it takes a user to bounce off the page), and though it’s a small part of their algorithm, you want to do everything in your power to keep the Google gods happy.
Which Plugins Should You Choose?
We knew the answer to this question, but we also asked a few other bloggers – just to see what was most important to others. But the top pick overall was unanimously a good SEO plugin that will analyze your content.
Yoast SEO is probably the most popular SEO plugin out there, but we are personally more partial to Rank Math ourselves. They are both free and very comparable, but we think Rank Math is a bit more comprehensive.
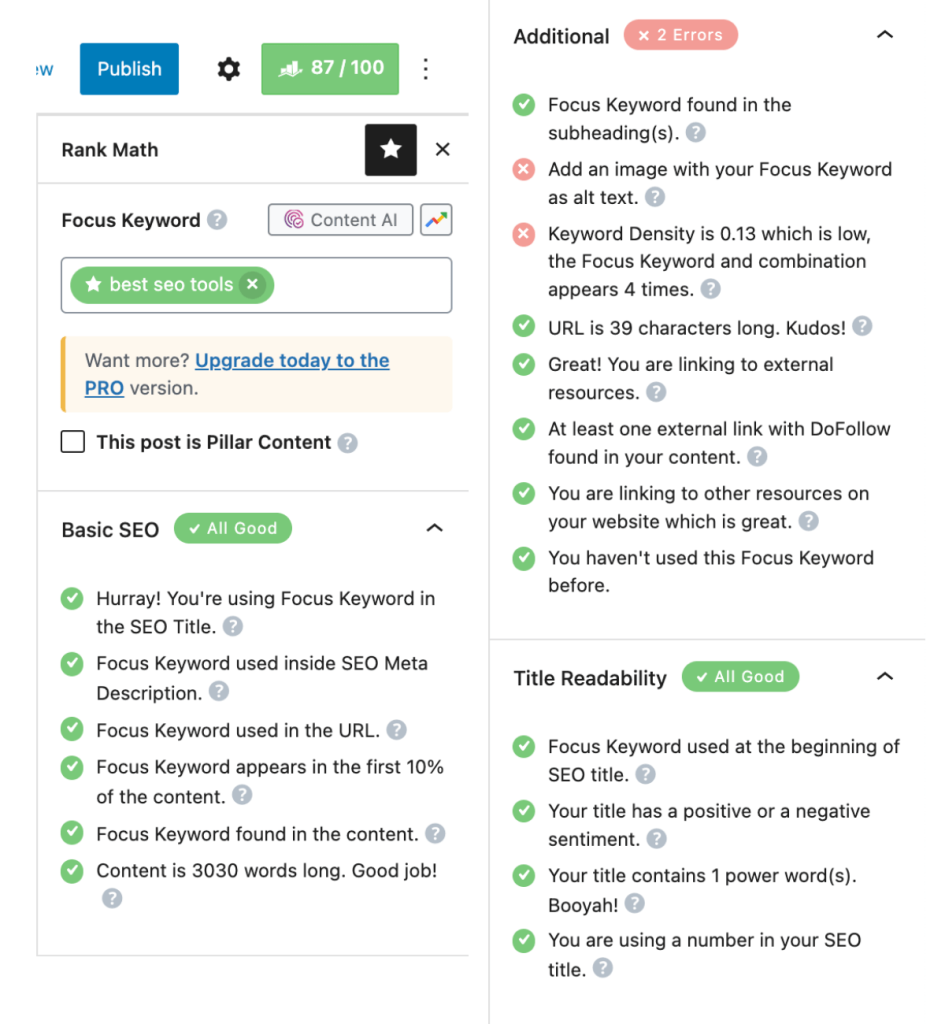
They also both have premium plans available, but the free plans are plenty sufficient enough for 90% of users (including us). We prefer to save our pennies for other expensive SEO software (more on that later).
Other plugins you might want to consider for your WordPress website are:
- Google’s Site Kit: This is the “official” Google WordPress plugin that shares metrics and insights from top Google products such as Analytics, Search Console, and AdSense
- Wordfence Security: This plugin will improve the security of your website by scanning for malware and blocking malicious IP addresses with a firewall.
- UpdraftPlus: This plugin will create automatic backups of your website (because WordPress doesn’t automatically do this and your options with your hosting company may be limited).
- WPForms: This is a plugin that lets you create contact forms on your website.
- Redirection: This is a plugin that will help you easily set up redirects on your pages and fix 404 errors.
- Pretty Links: This is another link-related plugin that lets you create tracking links for your affiliate links. This is really important when you get more into affiliate marketing.
While we’ve mentioned a lot of plugins here, make sure you do your own research and choose the plugins you feel are right for you.
You can also view our full list of recommended plugins here.
And just to reiterate — think before you download! Some plugins are a really easy fix but you can often get around using plugins if you dig a little deeper for an alternative solution.
Your Website is Online. Now What?
We’ve shared how to use WordPress to get your website online. But what comes next?
Your work has only just begun! What is WordPress used for if not to make you money or at the very least get your message out there, right?
In the next sections, we’ll dive into the nitty-gritty of how to work with WordPress as a blogger.
Writing Your First Post
We’ll forego the standard advice of telling you that you need to pick a niche because if you’ve made it this far in this post, we’re betting you’ve already chosen your niche.
However, if you haven’t, check out these two posts:
For everyone else, let’s get your first post on your brand-spankin’ new WordPress blog so you can share it with the world.
Some people opt to write their first post as an introduction to their blog. Some (like us) opt to dive right into the main content show.
It’s totally up to you and there is no right or wrong here. If you want to make money with your blog and start getting visitors, you’ll probably want to dive straight into the content most relevant to your audience.
To do that, your best first step is to start with a brainstorming session.
1. Brainstorm Topics
Open up a Word or Google Doc and start thinking about all the various elements of your topic. Jot down everything that comes to mind with it.
We’ll use a pretty random blog topic to give you an example of what your thought process might look like:
Main Topic: Sewing Costumes for Cosplay
Subtopic ideas:
- Best fabrics to use
- How to create patterns
- Best threads for a sewing machine
- Glue that works best with fabric for quick details
- No-sew cosplay projects
- The finishing touches – what materials to use
- Building on old costumes to create new ones
- Recycling clothes for cosplay
You get the idea. Basically, we want you to just do a full brain dump of all the relevant subtopics that someone might be searching for.
You could even break these subtopics down further like this:
- Best fabrics to use
- Velveteen
- Muslin
- Tartan
- Corduroy
- How to create patterns
- Best apps for designing patterns
- Tracing your clothes to create basic battens
- The best paper for costume patterns
This is why having a topic you care about is so important. You will run out of ideas quickly if you’re not knowledgeable about them or don’t care enough about what you’re writing.
Pro Tip: Use Google to come up with additional ideas.
Open up Google and type in every subtopic you come up with. Then, head down to the “People also ask” section of the search, and voila!
You’ll instantly be presented with a whole bunch of additional ideas you can write about.
2. Categorize and Prioritize Your Brainstorming List
Take all of the ideas and add them to an editorial calendar. We recommend using a project management tool like Notion or Trello for this. OR you can always use trusty old Excel for this!
Then, reorganize the topics into related categories.
For our sewing costumes for cosplay example the categories might look like this:
- How to Guides
- Best of – Cosplay Examples We’ve Seen
- Tips and Hacks For Creating Your Costumes
Then, under each category, you can decide which ones you want to write about first. This is the prioritization part:
- Pick your favorite topic
- Start with the one you’re most knowledgeable in, or
- Do some keyword research using a program like SemRush or Ahrefs to see what is most likely to yield visitors organically.
You can also check out other keyword research tools to help you choose keywords for your articles.
Pro Tip: Don’t forget who you are writing for!
Having an ideal reader in mind will make it much easier for you to plan and write your content. Knowing their main pain points and experience with your topics will help you better relate to them.
To learn more about writing posts with your ideal reader in mind, check out our post How to Write a Blog Post Your Readers Will Love: 5 Steps + 5 Tips.
3. Outline and Research
You’ll find that writing content comes much easier when you first start out with an outline of what you want to cover. It will keep you organized and help you hit all of the important talking points.
Remember that you don’t need to give your reader all of the knowledge in one post. If it’s too large or broad for one post, break it into additional subtopics and posts.
Here is another example on the topic of costumes.
- Blog Topic: Glue that works best on fabric
- Intro: What is this post going to cover, and why should the reader care
- Body:
- Five types of glue that work well with fabric
- Gorilla Waterproof Fabric Glue
- Aleenes Fabric Fusion Adhesive
- Elmer’s Craft Bond
- Beacon Fabri Tac
- Tips for using fabric glue
- Adhering metal to fabric
- The importance of ventilation
- Preparing the fabric for best adhesion
- Five types of glue that work well with fabric
- Conclusion: Brief recap
- Call to action: This is where you can make a paid offer, ask people to join your email list or do any other thing your heart desires.
How long should a blog post be?
How long should my blog post be? That’s a great question! And, unfortunately, one that doesn’t have a simple answer.
Different blogging experts will give you different opinions on the matter. Some say that shorter is better, while others argue that longer posts are more effective.
The length of your blog post should ultimately be determined by the topic you’re writing about and your audience’s needs.
If you’re blogging for business purposes, then you’ll want to err on the side of longer posts – think 2,000+ words.
That’s because longer posts tend to rank higher in search engine results and they give you more opportunities to include keywords and other SEO-friendly elements.
Of course, that doesn’t mean you should start churning out 2,000-3,000 word posts on a regular basis. But again, it all depends on the topic and your audience.
If you’re blogging for personal reasons or you’re just starting out, then shorter posts are probably fine to start getting your feet wet and develop a healthy body of content.
You can always experiment with different lengths to see what works best for you and your blog.
So there you have it! The answer to the question “how long should a blog post be?” is that there’s no one-size-fits-all answer.
Don’t Promote That First Post Yet
You might be surprised to hear that we don’t recommend you promote your first post once it’s live.
Not yet anyway!
You can hit the launch button right away, but you should have at least five (preferably more) posts published before you start actively promoting it.
Good blogging is all about consistency and regularity. By having a few posts ready to go before you launch, you can make sure that your blog gets off to a strong start.
Plus, it’ll give you a chance to fine-tune your blogging process and get into a good rhythm. Sometimes, our first few posts are a bit of a mess because we don’t really have the hang of what we’re doing yet.
Additionally, it will give your new visitors plenty of meat to chew on once they arrive on your page.
So how many posts should you aim for?
A bare minimum goal is to have at least five quality posts written before you launch. If you’re feeling confident and have the time, aim for 10 or even 20 posts before you start your promotion process.
Use Internal Links Wherever Possible
Google loves websites that keep readers on the page. So, when relevant, link your other blog posts about related topics!
For example, with our cosplay costumes topic example, when writing a post about the best glues for fabric, it would make sense to link to a post about the best fabrics to use in your costumes.
The more value you can deliver to a reader, the better!
Alex Rose of Golfible says that internal linking is especially in the beginning when you’re just getting started in the game. He said:
“Internal linking helps your readers navigate your blog and is also an excellent way to entice new readers to read older content. Furthermore, when you have a post that ranks high in search engines and has many backlinks, any internal links from that page to your other pages help boost the rankings of those pages [as well].”
WordPress Tips: Advice From Successful Bloggers
We’ve covered a LOT of information in this post on how to use WordPress so far, but we’re not done yet.
We practice what we preach and want to deliver maximum value to you, so we thought we’d close things out with a round-up of the best WordPress tips bloggers had to share with us.
Learn All You Can Before Diving In
Rei Shen of Success in Depth says the best advice for how to use WordPress is to take the time to understand how it works before you create your blog.
Rei said:
“Many novice bloggers may be tempted to jump right into writing their blog posts, but it’s important to understand the tools you’ll be using. After all, they are the core part of your website.”
We couldn’t agree more. There are so many awesome tutorials online for every plugin, every theme, and even how to do keyword research and start writing.
You can start with our comprehensive article on the best blogging tools!
Get Good at SEO
Helen Garfield of The Creatives Desk said that getting really good at SEO is critical if you plan on using WordPress to make money.
Don’t stop at installing SEO plugins. While they are great for analyzing your content, you should also invest in a keyword research tool and write quality content around that.
Some of our favorite SEO tools:
Check out the full list of recommended SEO tools here.
To further optimize your website’s search engine ranking, you might want to consider a plugin that will increase the speed of your website.
Get Familiar with WordPress Security Best Practices
Jenny Ly of the travel blog Wanderly recommends learning how to protect your WordPress website and as a byproduct your content and business overall.
Some of these include:
- Using strong passwords: Don’t use a password for your WordPress blog that is connected to any other account! If a hacker cracks your credentials for one website, it’s not uncommon for them to try them on several other websites.
- Change the name of your “admin”: The user name “admin” is the first one hackers try to crack!
- Use Two Factor Authentication: While this will require another plugin, it will help you prevent hackers who guess your credentials from authenticating their login!
- Limit login attempts: Once a hacker finds your website, it’s likely they will attempt logging in multiple times with multiple credentials to see if they can sneak in. Using a login limitation plugin will prevent IP addresses from multiple chances to break down your digital door.
Aquif Shaikh of Blogging Ocean added to this that you must also use caution with plugins. Don’t add any plugins that haven’t been updated in a long time.
When developers abandon their plugins, that’s when hackers will exploit them and find backdoors into websites. Read reviews, and research whether or not the plugins you’re considering are being updated. If not, choose another one!
And, don’t forget to update your plugins on your own website! Once you’ve added a plugin, you need to click the update button to ensure you’re using the current version.
Again, older versions of a plugin are a breeding ground for malicious activity online.
Don’t Get Too Bogged Down with the Design
Chrissy Carrol of Snacking in Sneakers said, “Many bloggers spend months tinkering away on the formatting, the logo, the colors…all time that could be used focusing on creating content and starting to rank on Google.”
She went on to say, “I recommend using a simple, fast, and clean theme like Astra or Kadence, get a bare-bones site up quickly, then start publishing content. You can always go back and improve the look later if you want, once you actually have the traffic coming in.”
Back Up Your Website Regularly
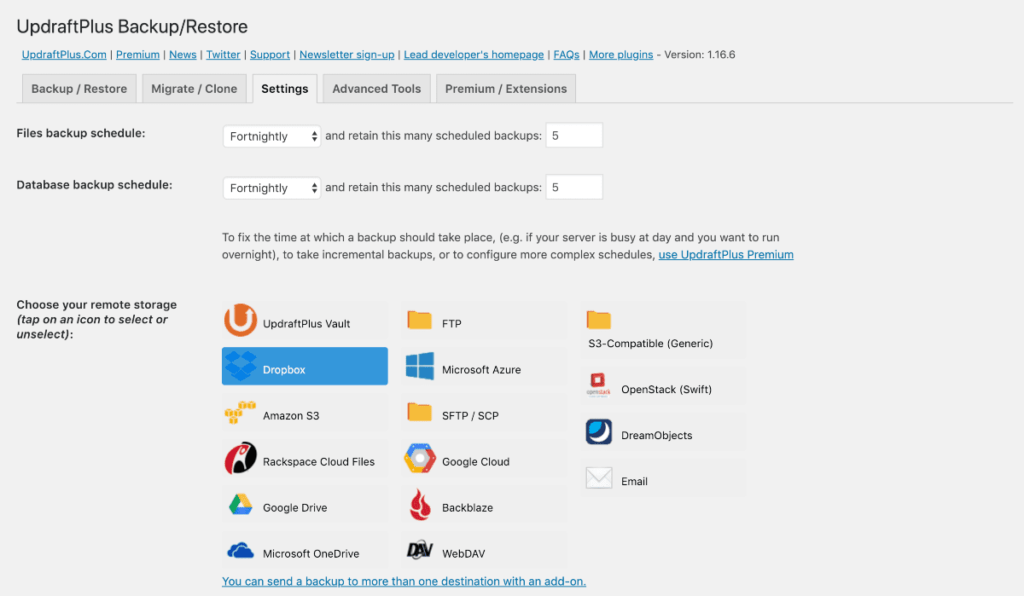
Jen Jones who blogs at Your Dog Advisor says to back up your blog early and often. The reason goes far beyond website security, which we touched on briefly when recommending UpdraftPlus in the plugins section.
When you start downloading plugins and themes, it’s very easy to “break your website.” There is nothing worse than a blank screen and not being able to log in to your website and having no idea what to do to fix it.
I’ve been there and done that many times.
Karen Hittelman who blogs at Grab Your Happy said one of the reasons it’s so easy to break your website is that some plugins are actually incompatible with others.
With regular backups, you don’t have to worry about whether or not your content will still be available if you have to remove one of those plugins or themes.
There’s nothing worse than writing a bunch of content only to see it go up in smoke.
Pro Tip: Write your posts in Google Docs or Word BEFORE copying them into WordPress. This is just another form of backing up your content, and helps ensure that you can get stuff back online quickly should anything go wrong.
Don’t Give Up
Shaun Hammond who blogs at The Traveling Drifter said his best advice is not to give up. He said:
“You will get frustrated and want to quit, that is where you need to overcome and remember why you are blogging in the first place.”
We couldn’t agree more on this point. It took months for us to get our first website in the green. Months of trial and error and doubt and overwhelm.
But we can tell you that the juice is definitely worth the squeeze, my friends.
Keep on keepin’ on!
Just Start Already!
Andy Fraser who blogs at Guitar Inside Out said his best advice for getting started with WordPress is simply to dive in!
He said, “It’s fairly easy to pick up the basics and you can very quickly be publishing a blog. Then, over time you can investigate the capabilities that a platform WordPress provides and really get creative with what your website/blog looks like and how it functions. But to begin with, just get started!”
We agree!
There is certainly a learning curve when it comes to how to use WordPress, but the good news is that you can’t really go wrong here. You learn and you fix your mistakes and you get better.
And we’re here to help! We hope that we can be a guiding resource for you along this journey!
Here are a couple of resources for you to check out next:
Have any lingering questions? Loved this guide? Let us know in the comments below!