Are you interested in learning how to start a blog? Blogging is an incredible way to build a creative space of your own that can also have a big payoff.
Starting a blog was the best decision we ever made. It launched us into a new life full of freedom and adventure that we could never have imagined.
But with so much competition out there, it can be difficult to know how to start a blog successfully and the right way.
We were in corporate jobs before we started blogging, and we were tired of chasing fleeting weekends and vacations that never lasted long enough.
Fast forward and we have since:
- Started 5 blogs in various niches
- Earned $100,000 with our first blog and a combined $1 million across various blogs
- Taught over 17,000 students how to make money with a new blog
That’s why we’ve put together this comprehensive guide on how to start a blog in just 20 minutes or less – without any website coding skills. We’ll wrap it up by showing you 5 different ways you can begin earning money through blogging right away—no matter what type of blog you have or what topics you want to cover.
You can also follow along with our video tutorial on how to create a blog here:
We partner with some pretty awesome companies that offer products and discounts that help our audience achieve their goals. If you purchase through our partner links, we may get paid for the referral (at no additional cost to you). Read our disclosure for more info.
- 1. Choose Your Blog Topic and Name
- 2. Get a Hosting Plan to Take Your Blog Online
- 3. Design Your Blog With a Theme and Plugins
- 4. Write Your First Blog Post (With AI)
- 5. Promote Your Blog and Get Readers
- 6 Ways to Start Earning Money with Your Blog
- FAQs About How to Start a Blog
- Biggest Takeaways for Starting a Blog
1. Choose Your Blog Topic and Name
The first step to learning how to start a blog is to set yourself up with a solid foundation, and that starts with your blog niche, or blog topic, and your blog name.
This is a place where a lot of people get hung up and end up delaying the entire process, but we’re going to get you cruising through this part with a solid niche and name.
How to Choose a Blog Niche
A blog niche, or blog idea, is the main topic that your blog focuses on.
Ideally, your main blog topic should be something you’re passionate or at least knowledgeable about so that you can provide great content for your audience.
If you’re unsure about what topic you want to start a blog on, you can use these 5 questions to help narrow it down:
- What do you have professional or personal experience in?
- What are your hobbies? What do you really enjoy doing?
- Have you overcome any problems? Can you share that journey?
- What would your friends or family say you can’t shut up about?
- What do they go to you for advice for?
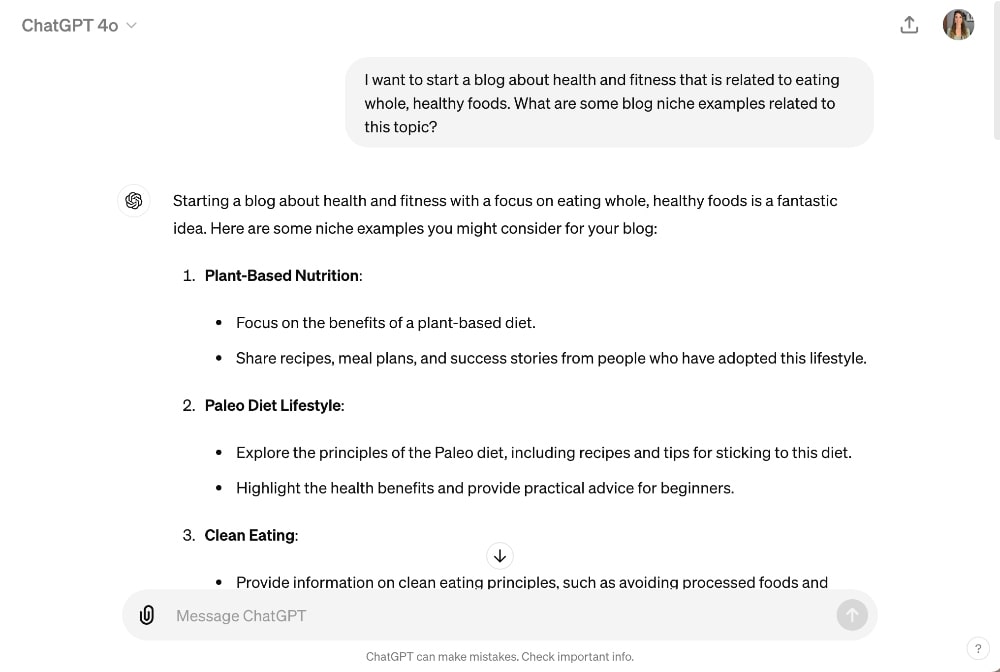
You can also use AI to help you choose a niche or to generate ideas for your main blog topic. Try using a prompt like this with ChatGPT or another AI tool:
I want to start a blog about health and fitness that is related to eating whole, healthy foods. What are some blog niche examples related to this topic?
How to Choose a Great Blog Name
Next, you’ll want to choose your blog name, which will also be the domain name of your site (the URL).
Your blog name can be descriptive of the blog topic or include a personal name (popular if you run a more personal blog) or some combination of the two.
Just make sure that your blog name is:
- Easy to spell
- Easy to pronounce
- Easy to remember
You can also use our free blog name generator if you want to get some more ideas before you create a blog.
You can also ask ChatGPT to help you generate some blog name ideas. Try this prompt (swap out your blog topic in the example below):
I want to start a blog about eating whole, healthy foods for the entire family with a focus on cooking meals quickly and on a budget. What are some blog name ideas related to this topic?

2. Get a Hosting Plan to Take Your Blog Online
In order to start a blog, you need to do two things, although they can be knocked out in one step:
- Choose a blogging platform.
- Get a hosting plan for your blogging platform.
WordPress is the blogging platform that most high-earning bloggers use because of the wide range of customizations and plugins. Platforms like Wix and Squarespace are better suited for other types of businesses (not blogging).
The good news is: WordPress is free with your blog hosting plan.
In this tutorial, we will walk you through how to start a blog with Bluehost for as low as $1.99/month with our exclusive discount.
We host several blogs on Bluehost and have been using them for years. They also have 24/7 customer service and are known for being one of the most reputable hosting companies in the industry.
Select Your Hosting Plan
They make it super easy to start a blog in just a few clicks! To get started, you can click here to open Bluehost (opens in a new window) (includes discount).
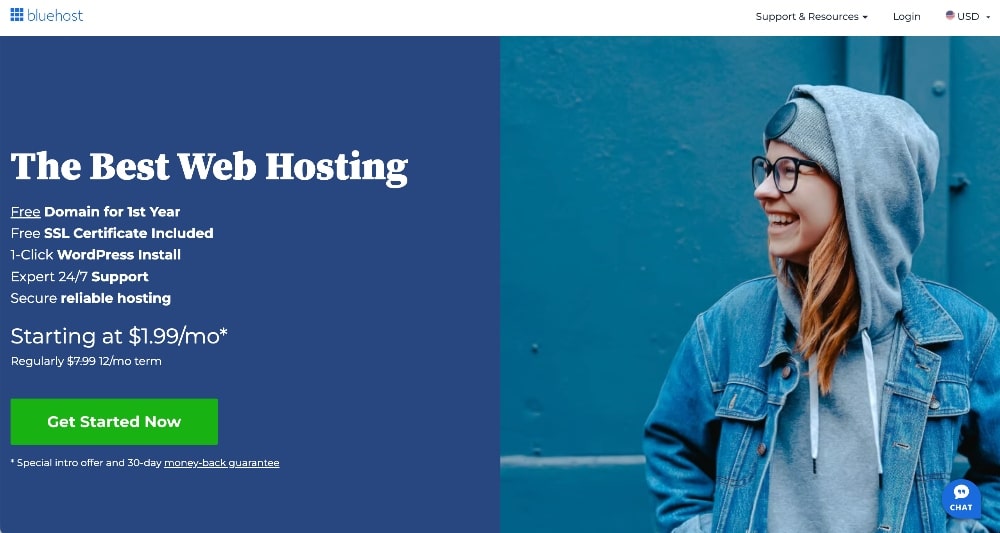
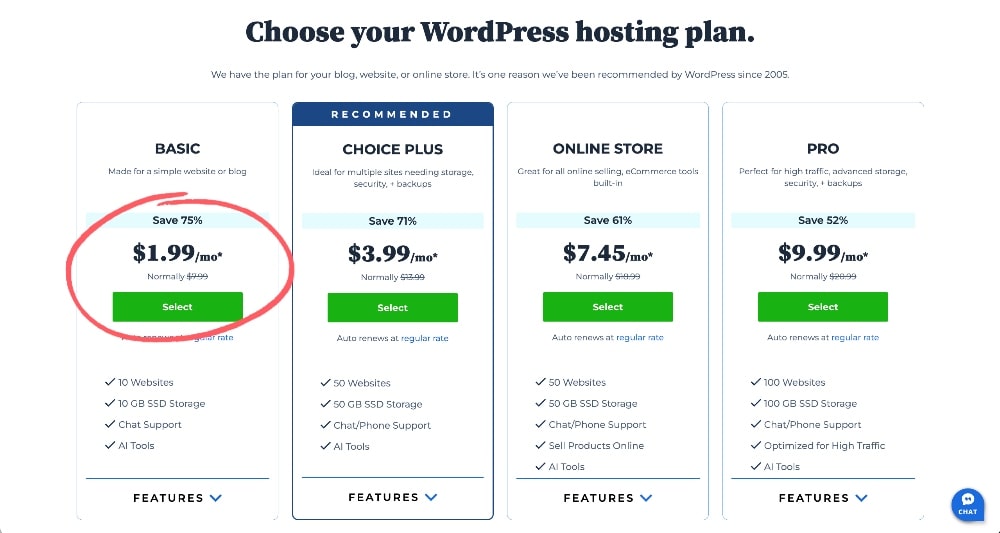
Next, click on the button to get started and you will be directed to a page with pricing options.
You can select just the Basic plan — you shouldn’t need any extra bells and whistles when starting a blog.
After selecting your plan, you will be prompted to enter your domain name.
This is simply the name of your blog and what will show up in your URL: i.e. Createandgo.com is our custom domain name for this website.
If you still aren’t sure about your custom domain name, you can still finish starting a blog now and click the link to “CHOOSE DOMAIN LATER.”
You can always add it on at a later time when your website starts growing, but this is totally up to you.

Next, click through to double-check your cart information. If you choose to select your domain name later, you won’t see the “.COM Domain” item listed in your cart (FYI).
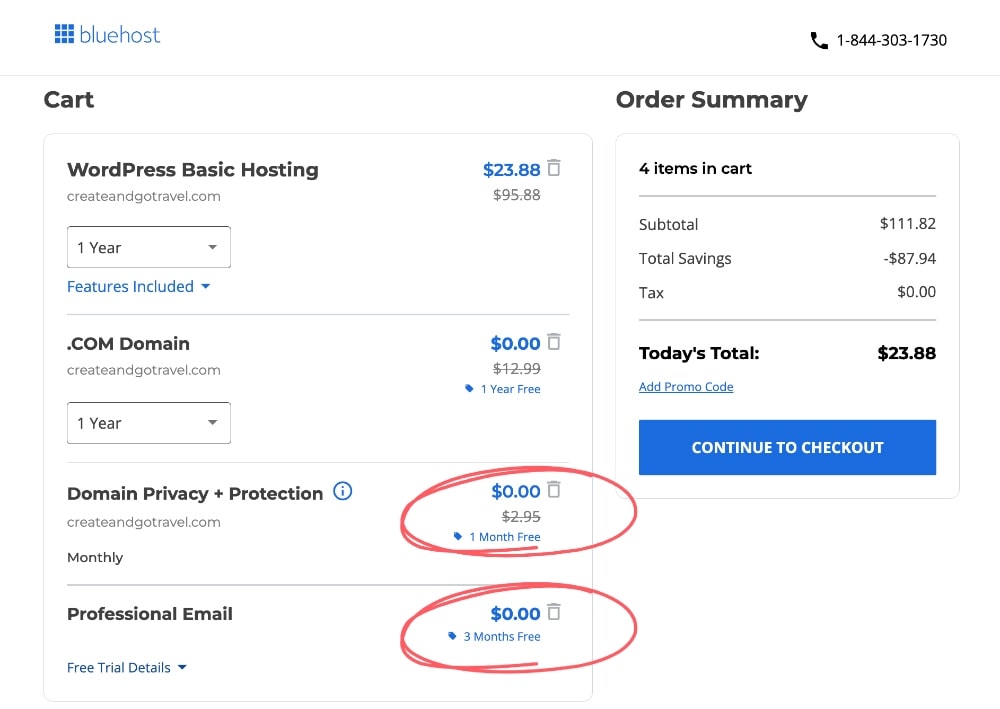
Otherwise, it should look like this if you have a domain name selected, but we are going to REMOVE two extra charges from your cart that you just don’t need right now:
- Domain Privacy + Protection: All domains are listed in a public registrar with the name, address, and phone number of the person who purchased the domain (you). You can pay an extra $11.88/year to keep these details hidden, but it just saves you a spam phone call or two. We don’t usually bother paying for this on new websites.
- Professional Email: You can set up a free domain email account through Bluehost + Gmail or a paid one through Gsuite later. You don’t need the professional email services from Bluehost.
So just make sure to click the trash can icon on these two items if you don’t want to pay for the extras beyond the free trial period:
Once you’ve removed the extras you don’t want, just click to continue to the checkout and add your contact details, account password, and payment information.
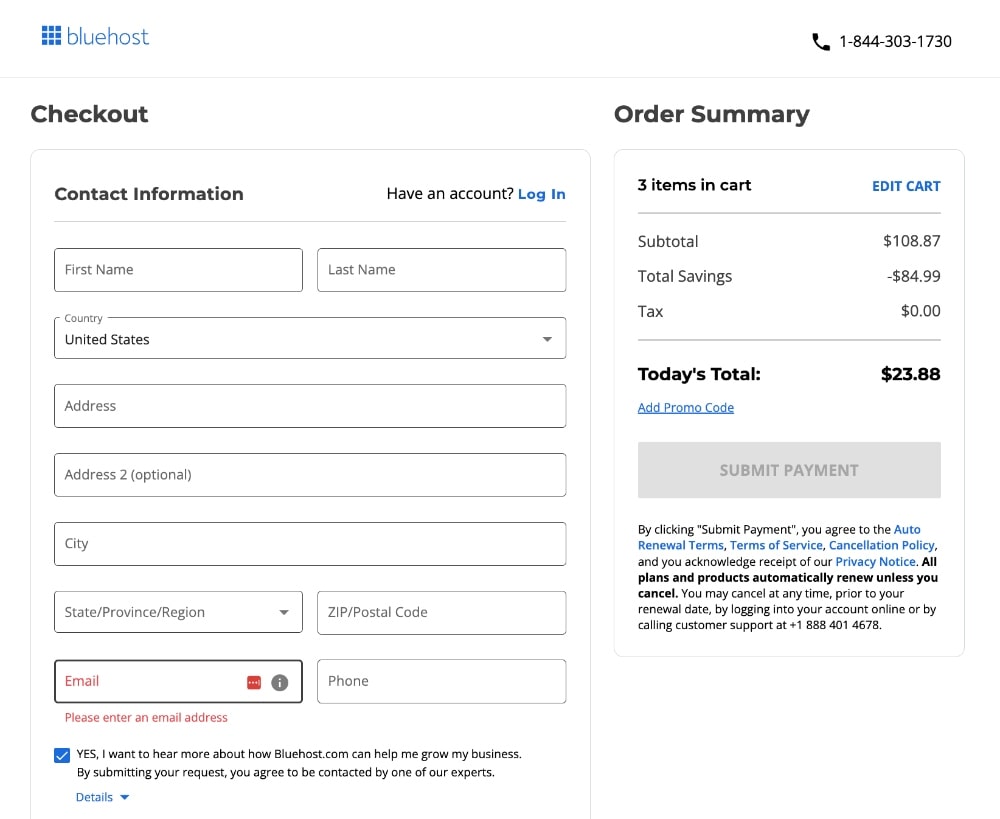
Then click the submit button and you’re done! ✅
Congratulations! You are now the proud owner of your own blog!
The next few steps will direct you to create your password and start automatically installing WordPress!
Explore WordPress
The next step in learning how to start a blog is getting WordPress set up and choosing a theme. For faster setup, check out how video on how to start a blog here (and skip to the setup part if you’ve already followed the steps above):
You will initially be prompted to choose from one of several free WordPress blog themes to start blogging with or to take a few other next steps. You can choose any theme for now just to get started and we’ll show you how to install a better free theme in the next section.

Overview of Basic WordPress Features
WordPress can be a bit daunting to learn when you’re just starting a blog and while there is a bit of a learning curve, I promise you that it isn’t that bad!
Once you understand the basics, you’ll get the hang of it really quickly. We’ve highlighted the main areas you will be working with below:

Here is a basic overview of these features:
The best thing that you can do to get ahead of the learning curve is simply to start playing around with your WordPress blog and familiarizing yourself with the different settings.
But before you get too far down that black hole, let’s move on to blog themes because installing a new theme will change some of the WordPress settings anyway.
3. Design Your Blog With a Theme and Plugins

One of the biggest steps to create a blog is, of course, to design it, and you will need a good theme for that. A blog theme is pre-coded website design software that allows you to customize the design of your blog without having to do any coding yourself.
There are thousands of free and paid WordPress themes, but a couple of the most customizable and beginner-friendly themes are Astra and Kadence.
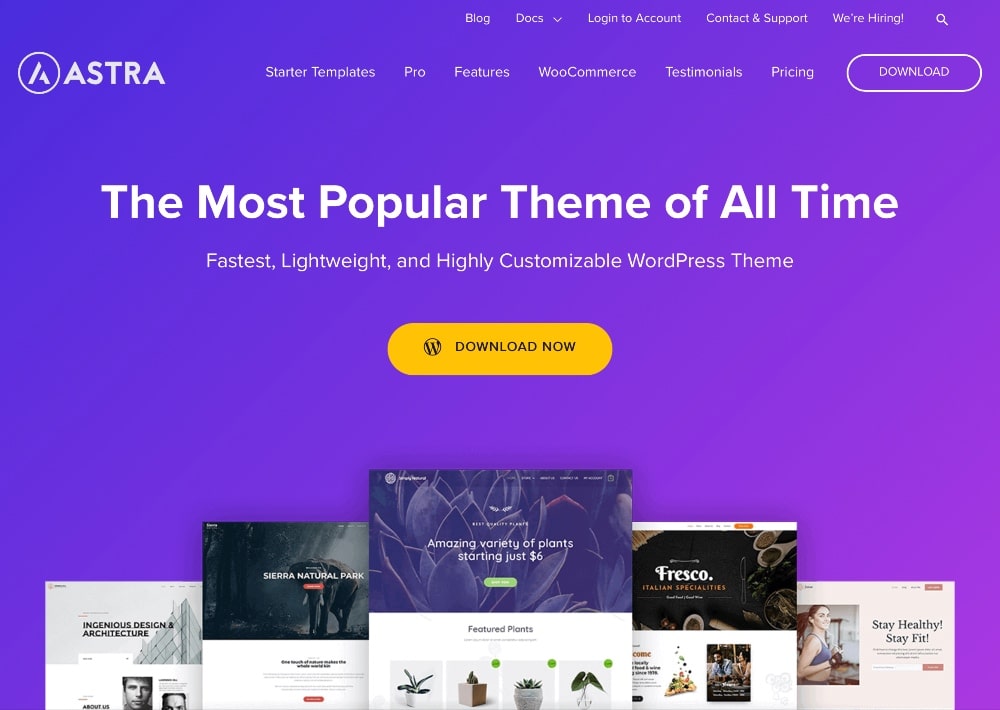
You can also start with a paid theme, like Divi, for added customizability but a free theme will work for most people to start with.
If you start with a free theme, make sure to download the free Elementor plugin to add extra customizability. Elementor comes with a drag-and-drop page builder that will allow you to create very customizable pages and design your home page however you want.
Blog design is probably the biggest area that people get hung up on when learning how to start a blog successfully and it can lead to a lot of wasted hours.
The truth is that you will end up changing your blog design many times as your blog grows, your content strategies change, and you start making money blogging. As you start building an audience, you will begin to learn more about who they are and what they are interested in and that will help determine how you design your blog.
The overall design matters very little in these early stages, so it’s best to stick with something simple and professional. You can also get some additional ideas for blog design in this article.
Create Important Pages
The first step to designing your blog is just to create the first few most important pages on your website.
Write an About Page
Writing a good About page for your blog is one of the most important aspects of building a successful blog.

Your About page serves as an introduction to your blog, allowing readers to learn more about you and develop trust with you.
It should be unique, personal, and offer insight into what readers can expect from your content.
When writing your About page, make sure to include:
- Who you are,
- What inspired you to start a blog,
- What topics your blog will cover,
- and what readers can expect from your blog.
Include at least one photo and make sure to add some social media links after you set up your profiles (more on that later).
Create a Contact Page
Your Contact page should be very simple and include a form that people can use to contact you. As we mention in the next section on plugins, you can install a free plugin like WP Forms Lite to use on your Contact page.

Include a couple of sentences telling visitors that they can use the contact form to contact you and provide an expected response time (i.e. 24-48 hours).
7 Free Plugins to Install on Your Blog
As we mentioned earlier, you should install a few important plugins right from the start to make sure that you’re running a successful blog from the start.
Here is a short list of our top recommendations for free plugins:
- RankMath (SEO): is an SEO plugin that can help bloggers optimize their website and content to make it easier to rank in search engine results pages (SERPs).
- WP Forms (Contact Forms): is a popular WordPress plugin that helps you easily create contact forms, surveys, polls, and more. There is a lite version that is free that you can start with!
- WP-Optimizer (Performance): Offers a range of features, such as database optimization, file compression and caching, code modification, page performance evaluation, and more.
- PrettyLinks (Affiliate Links): Allows blog owners to easily manage and track their affiliate links. With this plugin, you can create custom shortened links with your own domain and track the performance of each link.
- UpdraftPlus (Website Backups): Great option for backing up your WordPress blog, including all your files, images, and databases. It stores backups in a secure location such as Dropbox, Google Drive, etc., so that you can easily access them if anything goes wrong with your site.
- Wordfence (Security): Helps to ensure the security of a blog by monitoring and blocking malicious traffic. It uses an advanced firewall to prevent hackers from gaining access to your site, as well as scans for malware and malicious redirects.
- The UserWay (Accessibility): Helps to ensure a website is accessible and usable for all users. It adds an accessibility widget to your website, allowing visitors to adjust font size and color, as well as turn on a screen reader.
4. Write Your First Blog Post (With AI)
The next step in learning how to start a blog successfully is to start publishing your first blog post. When you start blogging, you should ideally have at least 5 blog posts published before you start promoting any content.
This will make your website look more established and will ensure that you have a few pieces of content for readers to look through to see what you’re all about.
For now, we will start with just publishing your very first post on your new blog and then we will move on to setting up social media profiles and learning how to promote your blog.
Your first blog post can also be whatever you want it to be. You can take the time to create a full article on a topic that you like or you can just keep it simple and write a story about yourself and your experience with the topic that your blog is about.
If you want to write about an important blog topic, we’ll walk you through the basic steps to get started. We will also share how to write a blog post with AI to help you get more creative and write posts in a fraction of the time.
Keyword Research
One of the best ways to get blog post ideas is simply to brainstorm blog topics and then do some keyword research to decide on specific keywords to use. This will help you understand what topics are most searched for and how you can optimize your content for those terms.
You can start by asking AI to generate some keyword ideas for you with a prompt like this:
I want to write an article on [how to start a blog]. What are some possible keywords I could include in this article?
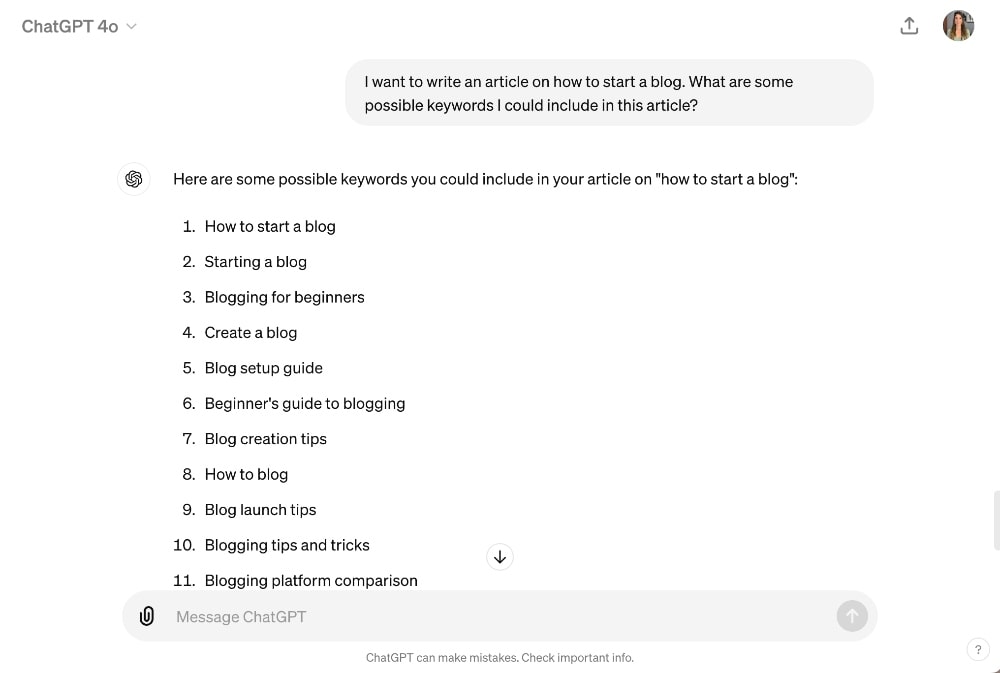
Then you could use a keyword research tool like Ubersuggest to help you narrow down which keyword you want to use based on the search volume potential and the keyword difficulty (how easy it is to rank for).
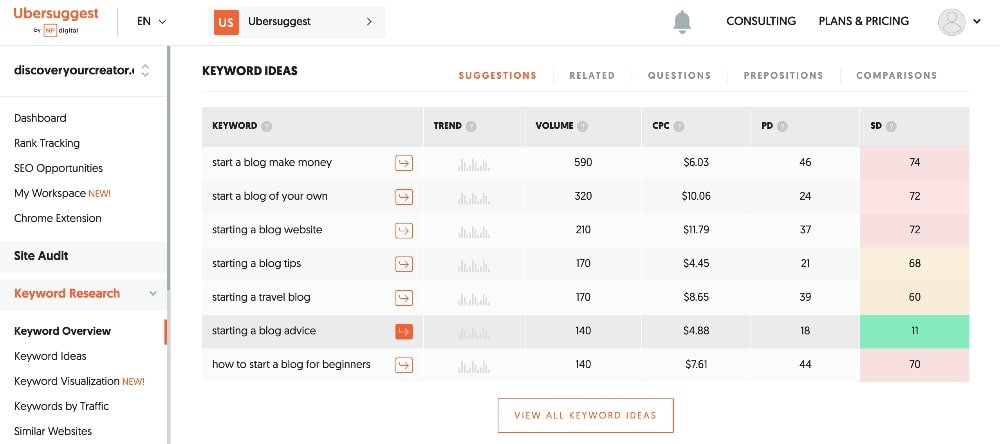
Once you have identified a few blog post ideas and relevant keywords, you can use these to write some new blog posts.
Decide on a Blog Post Title
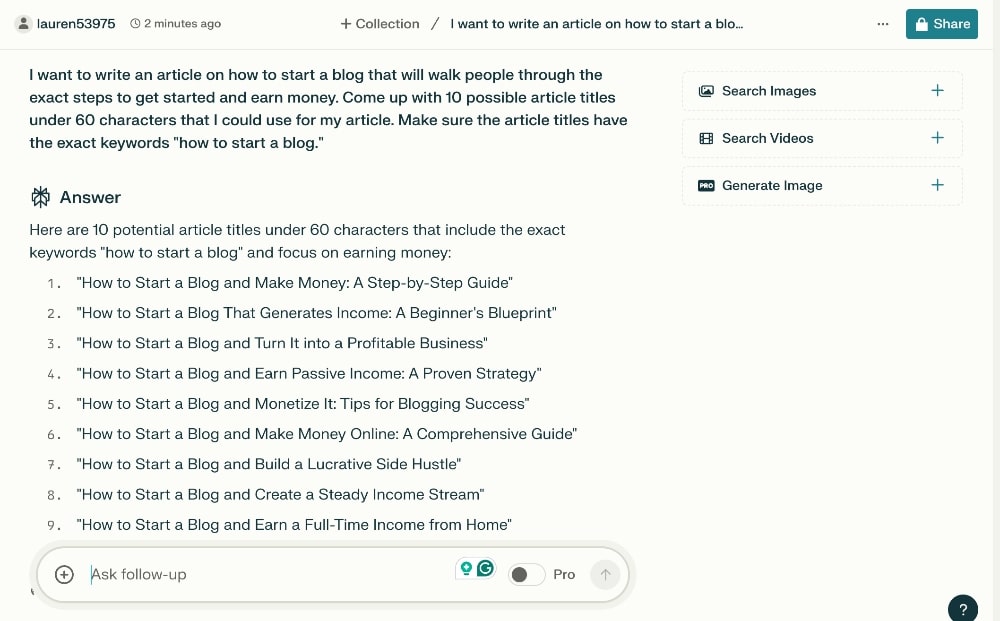
Once you’ve decided on an overall topic, you can also use AI to come up with some inspiration for your blog post title! When it comes to actually writing my blog post, I like to use the free AI tool, Perplexity, because it also provides helpful resources that you can use in your article.
You can use the prompt below:
I want to write an article on [how to start a blog that will walk people through the exact steps to get started and earn money]. Come up with 10 possible article titles under 60 characters that I could use for my article. Make sure the article titles have the exact keywords [how to start a blog].
Make sure to always use your main keyword in your blog post title. This is really important for SEO!
Create an Outline
Once you have identified the keywords and topic that you would like to write about, it is time to start creating your blog post outline.
A blog post structure should include an introduction, body content with important points to cover, a conclusion, and any necessary headings or subheadings to make sure your content is organized and easy for readers to understand.
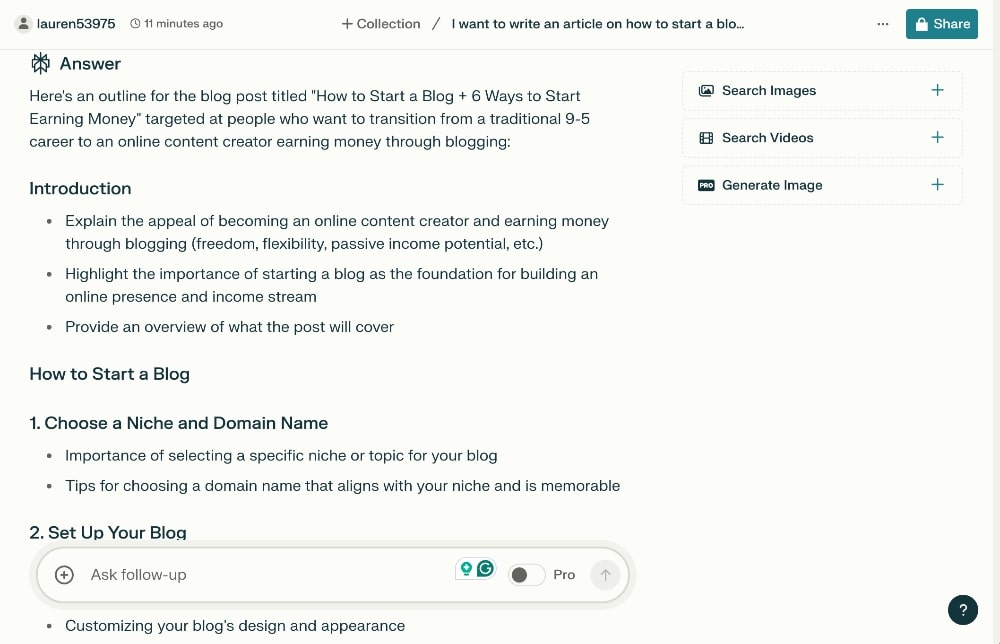
You can use this prompt to generate an outline with AI. Make sure to provide context on the audience you want to reach with this post.
My blog post title is: [How to Start a Blog + 6 Ways to Start Earning Money]. My target audience is [people who don’t know much about blogging yet and want to transition from a traditional 9-5 career to an online content creator who earns money through blogging.] Write an outline for this blog post.
Write the Introduction and Main Content
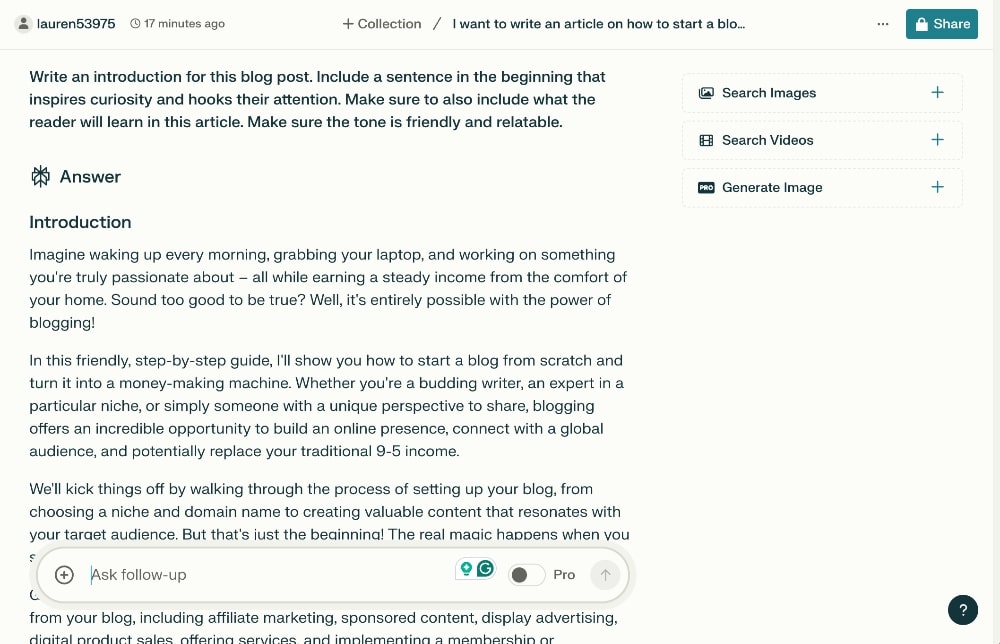
Writing an engaging introduction for your blog post is key to capturing the attention of readers and getting them interested in what you have to say. The first sentence should be a hook that grabs their attention, while the following sentences should provide more information about the topic of your blog post and why it’s important or relevant.
Make sure your introduction also gives the reader an idea of what to expect from your blog post.
You can use this prompt to start writing your introduction and next sections:
Write an introduction for this blog post. Include a sentence in the beginning that inspires curiosity and hooks their attention. Make sure to also include what the reader will learn in this article. Make sure the tone is [friendly and relatable.]
Then, you can follow up with these additional prompts:
Write the next section: [section title].
Finally, remember that when you write with AI, you need to use it more as a writing assistant rather than a writing replacement. Make sure to heavily edit your article and add your own personal thoughts, opinions, experiences, and stories to make it more unique and relatable to your audience.
Make sure to finish your blog post with a good summary and conclusion along with any next steps.
5. Promote Your Blog and Get Readers
The next step in starting a blog and promoting your content is to decide what kind of content you will create and which platforms you want to share it on. Without a solid blog promotion strategy, it will be difficult to attract new visitors to your website and build brand recognition and domain authority in your niche.
There are a variety of strategies you can use to promote your blog, from optimizing for search engines to sharing your content on social media. We’re going to cover it all.
As a blogger, you can create various types of content, besides just blog writing. Each type of content – written, voice, video – will have a different method of delivery, time requirement to produce, and impact on your audience.
Writing blog posts is still a great way to make your website look more established and professional, so we recommend starting there. But that doesn’t have to be your main source of traffic if you don’t want it to be or if you don’t actually like writing.
Although voice and video content are more challenging to produce, they also tend to be less competitive.
It can be difficult to muster up the courage to put your face on camera and have a real conversation with the world, but this can also make you very relatable to your audience. This reliability can help you build trust, which makes video content a great supplemental source of traffic that can also boost sales.
In order to maximize your reach and impact, you might want to consider utilizing at least one platform for written content, such as Google or Pinterest, and one platform for video content, such as YouTube, TikTok, and Instagram.
It’s crucial to create content that both resonates with your target audience and is comfortable for you to produce. But make sure to always think of your audience here because if they primarily use a specific social media platform, such as YouTube, it’s not wise to concentrate solely on another platform like Pinterest.
Next, we’ll go over your audience and a few of the most important types of content to help you decide which direction you want to go when starting a blog with a bang!
Target Audience
Figuring out who you’re talking to in the first place is an essential step in how to start a blog that is actually successful.
When it comes to content marketing, the most important factor to consider is who your target audience is and how you can create content that specifically appeals to them.
Identifying your target audience is one of the most important parts of setting up your blog business plan and blog template because it will help you decide what kind of blog content to create and how to structure it to make sure that it reaches the right people.
Understanding exactly who your people are and what they are feeling will help you tailor your content to their specific needs and build relationships with potential customers.
It’s important to understand not only the demographic factors of your target audience such as age, gender, location, etc. but also their interests and behavior.
Once you start getting blog traffic, you can access data on demographics through your Google Analytics account, which just takes a few minutes to set up. Until then, you should do your best to decide who you want to reach with your content.

Next, let’s talk about how to get traffic to your blog.
Content and SEO Optimization
We’ll talk about SEO first because it’s one of the most important traffic sources for bloggers.
SEO, or search engine optimization, is the practice of optimizing website content and structure to increase its visibility in search engine results, resulting in more organic traffic. It involves a variety of techniques such as using the right keywords, optimizing page titles and descriptions, linking structure, headings, and more.
On-Page SEO
Let’s start with the fundamentals of SEO and the easiest to set up when you are just getting started.
On-page SEO involves optimizing the various elements of your individual posts, such as your post titles, meta descriptions, headings, links, keywords, alt text, and more.
Using an SEO plugin like RankMath, as we mentioned earlier, will help you to make sure that you have these basics covered:
- Keywords: Adding relevant keywords to your content helps Google and other search engines to see what your content is about and to connect users who are searching for those specific keywords.
- Headings: Using the right headings can help users navigate through your content and helps search engines see what the important key points of your article are.
- User Experience: Adding appropriate headings, links, and the right structure will help to create a better user experience, which is also important to Google.
Overall, on-page SEO optimizes the key elements of your blog posts to help search engine algorithms better understand the purpose of your content and how it should be ranked compared to other websites with similar content.
SEO Tools
If you want to focus heavily on getting your content to rank, you will need to utilize some SEO tools to help you optimize your posts further.
SEO tools typically offer features such as keyword research, competition analysis, on-page optimization checks, backlink tracking, and more.

They can also help you to identify opportunities to improve organic rankings and show you what competitors who are ranking are doing differently with their own blogs.
Some SEO tools track rankings to monitor how your content ranks for specific keywords compared to competitors and offer comprehensive reports on impressions, clicks, and rankings of each page.
Make sure to also utilize Google Search Console to identify other areas of improvement on your site.
Guest Blogging and Outreach
Guest blogging is another effective way for bloggers to gain additional traffic and exposure for their blogs. By writing guest posts for other blogs, you can reach a wider audience while also building relationships with other bloggers in the same niche.
Guest blogging provides an opportunity to write content that will be seen by more people and can help attract new readers who may not have otherwise found your own blog.
Perhaps the biggest benefit of guest posting is that it can also help improve your own SEO rankings by providing more backlinks from higher-ranking blogs.
It will also help you build credibility and establish yourself as an expert in your field.
In order to find guest post opportunities, you generally need to do a lot of outreach to other bloggers and websites. This involves finding websites that offer guest posts, contacting the websites to pitch your guest posts, and then following up once you land the gig.
Building relationships through outreach and guest blogging will also help you identify other opportunities for content collaborations or cross-promotions of products.
Never underestimate the power of networking within the blogging community. It has provided us with invaluable expansion, exposure, and sales over the years.
Social Media Marketing
Social media marketing is what you are probably the most familiar with when it comes to promoting your blog.

When it comes to social media and content marketing, it’s important to create a targeted approach to make sure that your content reaches the right people with the right intent.
Simply put, content marketing involves creating content that appeals to your target audience and sharing it through different channels, such as email and social media.
With the right content strategy, you can foster relationships with your audience and potential customers while growing your brand recognition.
The best approach to social media is usually to choose a couple of platforms to focus more of your time and attention on, rather than trying to post everywhere all the time. That being said, it still probably makes sense to at least set up social accounts on the most popular platforms so that you can make sure to secure your username.
In the very least, consider setting up a social media account for:
- YouTube
- TikTok
Follow the instructions for each platform, set your username, add a photo, and add an interesting bio to your profile.

Paid Marketing and Ads
This method isn’t necessarily something most people think about when they start a blog, but paid ads can be a great way to scale your blog traffic.

Ads help increase visibility and engagement with potential customers who may not have otherwise discovered your content organically.
Paid marketing also offers a variety of other benefits such as increased brand recognition, better conversion rates, higher return on investment (ROI), improved customer loyalty, and much more.
You can use analytics tools such as Google Analytics and Google Search Console to track performance metrics like CTRs and ROI so that you can adjust your strategies accordingly.
When done correctly with smart targeting tactics and well-crafted ad copy, it can be a great way to scale up traffic in a relatively short amount of time, but it’s generally a step you want to take after monetizing your blog.
Social Media Advertising
Everyone and their grandmother is familiar with this type of advertising because we see it so often now on Instagram, YouTube, etc.
With social media advertising, you can target specific demographics based on factors such as age, gender, interests, location, etc., and create highly targeted campaigns that are tailored to the content of your blog.
This type of personalization can increase click-through rates (CTR) and overall engagement with your content.
Search Advertising
Search advertising is another great way to get more eyes on your blog. In addition to using SEO techniques, you can also set up paid campaigns on search engines such as Google Ads or Bing Ads.
This allows you to bid for keywords relevant to your blog topic so that when people search for them, your ad will show up at the top of the results page.
Email Marketing
One of the best ways to advertise your blog is through email marketing because it enables you to target your audience with highly personalized content and build relationships over time.
It allows bloggers to speak directly and personally through tailored messages that encourage subscribers to take action, such as watching a video or buying a product.
You can use your email list to share new content, get subscribers on other platforms, offer discounts, collaborate with other bloggers, and more.
It can also be a very effective marketing and sales tool for the products that you sell on your blog.
This makes it easier to convert and retain customers who are already interested in your blog’s content.
You can also track performance metrics like open rates and click-throughs to measure the success of your emails and optimize future campaigns accordingly.
The key is to create targeted campaigns that strike a balance between delivering value and promoting products and services, which help bloggers can create meaningful relationships with their readers while growing their business in the process.
Overall, email marketing is an essential tool for any blogger looking to grow traffic and generate sales from their blog posts.
Start an Email List
After you finish writing your first few blog posts and you are ready to start promoting your content, you should create an email list.
The very first step is to create a form for your subscribers to opt-in.
Most people don’t want to sign up for another newsletter, so it’s important to offer a freebie, also called a lead magnet, to incentivize readers to sign up for your email list.
This can be as simple as a free guide or checklist or as complex as a free mini-course like our free start a blog challenge:
The best free tool for creating this freebie is Canva. They have templates for every case you can think of and are great for creating most free guides or downloads.

You’ve probably seen these in the form of discounts on many eCommerce sites that sell products.
Just make sure that your free offer is closely tied to the topic of your blog and even any potential products to make sure that you are attracting the right people to sign up.
You need an email marketing service to manage your forms, landing pages, email contacts, email campaigns, and more.
We recommend starting out with Kit’s free plan because they have a ton of different forms and landing pages that you can choose from to get started.

Make sure to write a good welcome email that introduces yourself and your business and that also provides them with the freebie that they signed up for.
Send Content to Your Audience
There are two main types of email content that you can send to your audience: broadcasts and campaigns.
Automated campaigns, also called email funnels, are emails that are pre-written and set to automatically be sent out to subscribers on specified days.
For example, a welcome sequence is a series of emails that are sent out on subsequent days after a new subscriber signs up.

Broadcasts are one-time emails that are sent out to subscribers, but they can also be written ahead of time and scheduled in advance.
For example, if you want to share a new YouTube video or podcast episode with your audience, you would write a new broadcast to share that content with your audience.
When writing emails to your audience, make sure to always focus on delivering value to them first before asking for a sale.
Create an Email Sales Funnel
Once you have a product to sell, you can create an email sales funnel, also called a sales sequence, for your product.
An email sales sequence, like a welcome sequence, is a series of automated emails that highlight a product sale – often with a discount or special offer to incentivize purchases.

An email sales funnel is one of the best ways to sell higher-priced products and start automating the sales in your business because you can schedule these campaigns to go out automatically when new subscribers sign up.
These email sequences usually last around 5-7 days and often provide a lot of value in the first few days before heavily promoting any sale.
6 Ways to Start Earning Money with Your Blog
We’ve finally made it to the most exciting part of our how to start a blog tutorial. I think actually learning how to start a blog is the most important part, but I know that most of you are the most excited to learn how to make money with a new blog.
There are a variety of ways that you can make money with a blog and each method has its advantages and disadvantages.
Not surprisingly, the easiest ways to make money are usually the least fruitful but the best strategy is to diversify with multiple methods of monetization.
The revenue on your blog will ebb and flow and change as your blow grows, so having multiple revenue streams in place will help you earn more and create a buffer against any unexpected downturns.
Traffic platforms can change, your audience’s preferences can change, and new competitors can all change the state of the market and your income.
1. Ad Networks
Ad networks are one of the most popular ways for bloggers to make money and also the easiest and most passive way to make money with a blog.
An ad network is a company that serves up ads on your website or blog and pays you based on ad clicks.
You can choose between a wide variety of ad formats to display on your blog, including display ads, text ads, video ads, and mobile ads.

Ad networks also sometimes allow bloggers to choose the types of advertisers want to work with, so that they can ensure that the ads being served fit well with their audience’s interests.
The best part about ads is that they allow you to monetize a large number of visitors who probably won’t ever buy your products anyway.
The downsides are that they look tacky, can harm the user experience, and require a lot of traffic to make significant income from.

2. Offer Freelance Services
Freelancing is one of the best ways to start making money in the blogging world while you are trying to grow and monetize your new blog in other ways. It can take time to start making real money from your blog and freelancing offers you a way to earn some side income as well as build relationships with other bloggers.
In the case of freelance writing, you can often have your name published with the content that you write and potentially even have a link back to your blog. This can build more exposure to your blog over time.
Other common freelance services that bloggers provide include graphic design, web development, social media management, and more.
The most popular platforms to look for or offer freelance work are Fiverr and Upwork:

The cool thing about freelancing is that it allows you to “learn on the job” and gain more experience from working with other bloggers that you can use in your own business.
It’s a great way to grow your skillset while also diversifying your income.
When it comes to freelancing services, you can either charge per project or on an hourly basis.
You may also want to consider setting up a subscription-style service where clients pay a recurring fee for your services. This allows you to establish long-term relationships with clients and increase revenue over time.
3. Affiliate Marketing
Affiliate marketing is one of the most effective ways bloggers make money and is how we earn a large portion of our blogging income.
When you sign up for an affiliate program for a brand or company, you can get an affiliate link for their product to share with your audience.
Different affiliate programs have different commissions and earnings potential.

When someone clicks on that affiliate link and makes a purchase, you receive a commission on that purchase.
Selling affiliate products is a really great way for bloggers to earn a significant income without having to take the time to create their own products.
It can be very passive when you set up your affiliate marketing strategy the right way.
The best way to make money with affiliate marketing is to focus on products or services that are very relevant to your audience and to create blog content around those products and services.
Always make sure to educate and provide value in addition to encouraging readers to click your affiliate links.
You can generally make the most money with affiliate marketing through strategic partnerships with brands or companies.
Some of our biggest strategic partnerships have led to customer discounts, customized landing pages, joint webinars, and other promotions that have helped us increase our affiliate sales.

4. Sell Online Courses
Selling online courses is a great way for bloggers to make money and is the method that has earned us the most money in our blogging career.
Courses offer you a way to expand upon what you share and teach on your blog and charge for access to that knowledge.
They take a lot more time to create and set up, but you can usually charge a much higher price for courses.
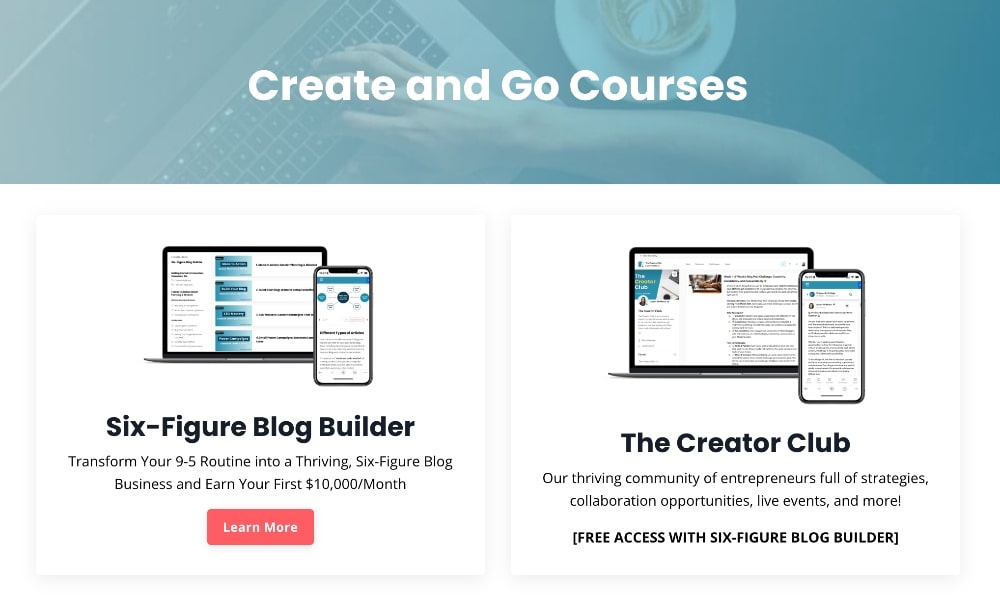
We sell our signature course, Six-Figure Blog Builder, on Kajabi:
When it comes to choosing a platform to sell your courses, you have two main options:
- Sell your courses on your own with a platform like Teachable or Kajabi (what we use).
- Sell your courses on a marketplace platform like Skillshare or Udemy that drives traffic for you.
Selling your courses on your own generally provides the potential for more income because you can charge higher prices and also allows you to have more flexibility to create your own affiliate program.
Partnerships are also a great way for bloggers to increase the reach of their online courses.
5. Sponsored Posts
Sponsored posts are another great way for bloggers to make money blogging.
A sponsored post is a post that a company or brand pays you to write, usually about a particular product or service, and publish on your blog and share it with your audience.
Sponsored posts can take many forms, such as written blog posts, video content, or social media campaigns.
The larger and more engaged your audience, the more you will usually get paid for sponsored posts.

Sponsored posts are great for bloggers for a few reasons:
- You get paid to write posts.
- It provides additional, usually relevant, content to share with your audience.
- It provides an opportunity to partner with other brands and companies.
This type of promotion can be more beneficial to the company or brand because it is often a more cost-effective route to reach a specific audience than paying for traditional ads.
6. Selling Other Products
In addition to selling courses, there are a lot of other types of products and services that you can sell on a blog. You can create physical products, digital downloads, subscriptions, memberships, consultation and coaching, and more.
Physical products can include everything from eCommerce sites to selling on Facebook shops to marketplaces like Etsy or Amazon.
Some popular digital downloads include eBooks, templates, and other online programs. Canva is another great resource to help with the design of your products.

Many bloggers offer consultation or coaching services to their clients at a higher price.
Marketplaces offer the added benefit of a new audience through search on the platform but selling products on your own website provides more flexibility with pricing and marketing.
FAQs About How to Start a Blog
Biggest Takeaways for Starting a Blog
Learning how to start a blog can be a daunting project, but it’s also very exciting and that’s what you should focus on.
With the right steps and the right plan, anyone can learn how to start a blog successfully and earn money within even the first few months.
We have had students earn significant money from their blogs in as little as 3 months.
Here are some of the most important lessons learned from this post:
- Create a blog with the right foundation, including your niche, blog name, and web hosting company.
- Install a customizable blog theme on your blog and start learning the ins and outs of your WordPress dashboard.
- Start out with a simple and professional blog design to get started and then focus on what’s most important: your content.
- Install the most important plugins on your blog to make sure your website is optimized for speed, performance, security, accessibility, and more.
- Write at least 5-10 blog posts before you start promoting your content to make sure that you have a wealth of content to share with your audience.
- Consider who your target audience is before you start creating content to make sure that your content resonates with them.
- Decide what kind of content to create and what platforms you plan to share it on. Ideally, you should create at least one form of written blog content and one form of other content such as voice or video content for building deeper connections.
- Decide how you want to make money blogging and remember to diversify with a variety of methods. Selling your own products and affiliate marketing will often generate the highest amounts of revenue for most bloggers.
Successful blogging is all about taking the right steps in the right order and staying focused throughout the process.
Additional Tips on How to Start a Blog Successfully
In addition to “following the plan” to create a blog, here are some other tips from our own blogging journey.
Increase Your Productivity
Becoming a successful blogger is often just about time. Starting any business takes a lot of time and dedication, so anything you can do to devote more time to your blog is helpful.
Carve out time in the morning before you go to work or in the evening before you go to bed. Work weekends if you have to (we certainly did in the beginning).
Stay Focused
When you create a blog, you have to wear a lot of hats and do a lot of jobs at once, especially in the beginning: content production, marketing, making money, customer service, and more. It can be hard to stay focused on what’s important.
Every day, think about the #1 most important task or project that you can tackle that will have the largest impact on your business’s growth.
Focus on that task completely until it’s done.
Hire Help When You Need It
As your blog grows, you will need to hire out help to manage all of the tasks of your business. It’s time to hire help when you start to notice too much stuff falling off of your plate.
If you wait too long, some areas of your profitable blog may suffer. Hiring out admin work or writing work is often where most bloggers start. This will help free up your time to focus on the most important aspects of your business like growing your business and increasing your sales.
Pay Attention to Your Competitors
Your blogging journey will take a lot of twists and turns and it’s important that you continue to grow, evolve, and change with it. You don’t want to find yourself with your head down working when everyone else is moving forward without you.
Identify several other successful bloggers in your niche and pay attention to the blog content that they are sharing and how it changes over time. Continue to test out new strategies and improve existing strategies when necessary.
Stick With the Plan
No matter what, trust yourself in this process. Find people to follow who inspire you. Take courses and never stop learning.
Learning how to start a blog can be challenging but also will be one of the most rewarding things you ever do in your life, in our humble opinion.
With hard work, some quality, value-driven blog content combined, and the right marketing strategy, anyone has the potential to start a profitable blog.
We hope that this step-by-step guide on starting a blog has been helpful! If you have any questions about how to start a blog or run a successful blog, feel free to ask us in the comments below!
This article is quite extensive, but I took the time to read it and discovered that we can use AI to write article posts. However, I have a question: if we use AI to write an article, will it rank on Google? Additionally, does Google support AI-generated content?
Thanks.
Hey, Samiul! In general, Google doesn’t penalize the use of AI-generated content. However, the search engine giant does have strict guidelines against low-quality, spammy, or automatically generated content that provides little value to users.
Google’s stance on AI-written content is similar to its stance on any other type of content: it should be unique, informative, and engaging for the reader. If the AI-generated content meets these criteria and provides a positive user experience, it is unlikely to be penalized by Google’s algorithms.
The websites that have been penalized and seen a drop in rankings are mostly websites that have 100% AI-written content without any human intervention at all. It’s important to think of your AI tool as a writing assistant rather than a writing replacement.
As a new blogger I found your recent post very useful which outlined nearly every steps a new comer need to follow from the scratch. You introduced several essential tools helping any blogger to grow the business during this post as well. I just wonder why you have not mentioned anything about the very trending way of writting blog posts by help of ai tools as I believe nobody can ignore it easily to utilize in blogging anymore. I hope you can revise this very helpful post to incorporate ai tools as well. Good luck!
Hey, Farhad! We have several articles on our website on the topic of using AI.
I’m a personal firm believer that once the mindset settles in with blogging and you do this in the infancy not to make money, the money will come in streaming full time when least expected. Do this from the heart and it’ll flourish. 🙂
Love this mindset!
Hi thank you so much for this guide, I enjoyed every step of it and learnt a lot as a beginner !
One more thing, how do you create many blogs under one website, I have visited many bloggers website after searching for a specific topic and still found their website with a different blog related to what I was searching for. How does this work. Need help ?
Hey, Jemima! Most website have a primary topic. (for example: a blog about dogs) Within that blog, there will be various subcategories that still relate to the main topic (for example: training, health and diet, product reviews – just to name a few). Within each subcategory, you’ll have articles written for that category.
What theme is used for this blog?
Hey, Chris! We have a custom coded theme on this website.
This is a very interesting and in-depth guide to blogging. Started my own blog recently and I’m now really interested in promoting it and increasing traffic. Any of your resources you can recommend?Thank you for the great blog post on everything starting a blog. It’s quite insightful.
Hey, Henry! Have you checked out our courses, linked in the menu?
Thanks for the guide on how to start a blog. May i know many blog posts required to start earning $100 a month?
There is no magic number of blog post to make $100/month. There are simply too many variables at play to give a definitive number.
Should have done this a long time ago. Well actually I did but my country is too small to make a living so recently I decided to try English. Have no idea if it will work but I love writing.
Thanks for a great blog. You guys are really inspiring! Really!!!! I come here almost every day just to taste the great vibe and read a little of course!
Hi! I’m excited to do this, but do you have any information on blogging through Wix? I see a lot of content about word press but would love more on Wix!
Hey, Thamara! Sorry, we do not have information about blogging on Wix at this time.
I am enjoying all of your content so far! It is so inspiring to me and so many others and I cannot wait to go through the whole site and learn everything that I possibly can 🙂
I just started my blogging journey today and haven’t set up my site yet but greatness is soon to come!
Thank you so much! We are super excited for you!
I love your positive attitude and I LOVE the word Greatness!!
Don’t get the Basic Plan at BlueHost. Upgrade and start 5, 10 or 100 bloggs instead. Think Big!
I’m a fan of “go big or go home”, but for someone brand new to blogging, we recommend starting with a single blog while learning.
I give up !!! I still don’t understand WHERE I post a blog…I have one follower from Medium.com, I have a website, I have Wordpress. I am brand new to this world of social media …it’s like I have a tank full of gas but do not know how to drive…
I am a financial coach, and my services are 100% on the telephone, and website.
You two seem great but I am missing some key information…
Thank you for your help..
Best,
Pegi
Hey Pegi, you’ll write and publish your blog post in Wordpress, then share it on social media so others know about it. There’s a lot more to getting traffic than just that. If you haven’t done so yet, I recommend signing up for our free eCourse linked on the homepage.
Hello, hello !!!! I still don’t get something about the money. My first job is to create a blog that helps people, that supplies value, etc….so it populates. And where exactly and when should you start attaching the links for people to acquire something. Right now, I have the following problem : I have in my mind a big bunch of ideas to create value around products (my background is sales) and creating webpages explaining lots of benefits around that , I don’t understand how will that come later. Help me since , I have asked this question in many forums and never get a straight answer. Please be crude with the answer. Some people like Anik Singal, suggest creating a landing page, get an email by trading a report, book, etc… start following up with a bunch of emails filled in with the affiliate link and start making money. That also makes sense to me , what am I missing ? If I begin my blog today, should it be nothing but information to help others without any selling info in it ?
For affiliate marketing, you will simply link to products within a relevant article, using anchor text. You’ll need to apply to the various affiliate programs though. When someone clicks on a link for a product you are an affiliate for, and they purchase through that link, you earn a small commission of the sale. Each affiliate program has their own pay schedule, but they pay out on a monthly basis once the minimum requirement has been met. The payments are usually setup via PayPal or Direct Deposit.
Thank you Cathy I believe I understand that, however the blogging career you guys train people for suggests a different approach, am I right ?
Affiliate marketing is one of the ways we recommend monetizing websites/blogs, but it is only one of many ways. The other big one we recommend is creating your own digital products. Other monetization strategies that we mention are Ads and Sponsored post, but our big focus is affiliate marketing and digital products.
I’m following the steps in your video and have clicked on themes, then the plus sign to “add new theme”, and I get this message: Your theme is managed by Bluehost website builder…Installing another wordpress theme while using Bluehost Website builder will limit its functionality. Are you sure you wish to continue?”
I click continue and receive this error:
An unexpected error occurred. Something may be wrong with WordPress.org or this server’s configuration. If you continue to have problems, please try the support forums.
The webpage I’m in is the same as yours in your video. You say in the video that you are in the wordpress builder, but I have seen the message that it is the Bluehost builder.
Contact Bluehost and have them take you off the Bluehost Website Builder. Let them know you only want their shared hosting.
So the basic plan can’t be used to make money as it doesn’t have marketing offer… Like I can’t use it for my affiliate, right?
Are you referring to the Basic Bluehost plan? If so, you can absolutely do affiliate marketing with that plan 🙂
I signed up for Bluehost. After logging into Bluehost and I get to the page ‘How would you like to build your WordPress site?’ It has two options: WordPress and Bluehost Website Builder. Which option would you recommend? Thanks, Stephen
Choose Wordpress. We do not recommend the Bluehost Website Builder because it has too many limitations.
Thanks so much for the recommendation. Don’t need limitations 🙂
I entered my email for the Get the Free 5-Day Blogging Bootcamp for Beginners! But is hasn’t shown up in my email !? Does it take some time to show up in the email?
Hey Stephen, please send us an email at theteam@createandgo.com so we can take a look
I’ll enter my email when posting the comment
I show that you received and opened the Bootcamp emails, starting on March 3rd.
Are you using Google Ads or Pinterest Ads or something? Aan if you are – are they included in your course?
Hey Debra, we sometimes run Google and Pinterest Ads, but pay someone to create them for us. We don’t have any lessons on Google Ads but we do include a couple of lessons on Promoted Pins in the Pinterest Traffic Avalanche course.
Thanks! that makes sense! Google Ads are complicated and look like a full-time job.
So, I don’t see any fees for you guys. Surely you have some kind of charges or commissions. Do I HAVE to take any of the courses? I just got a 4 yr degree in internet marketing, and I’m a pretty decent writer. That’s certainly not to say that I won’t have questions, but I have pretty well mapped out my game plan, which will be blogging about how to make it as struggling musician, and to gain credibility.
Hey George, you can view our paid course offering from the “Courses” tab in the menu. Everything else on this website is free to consume.